I still remember the first seam I ever sewed. It was on an old T-shirt I loved but had worn past the point of no return. The side seam had popped open, and instead of tossing it, I sat on the carpet with a borrowed needle and some kitchen scissors, poking my way through a crooked little line of hand stitching. Was it pretty? Not at all. But it held. And that, to me, was the moment sewing became less of a mystery and more of a skill I could actually learn.
Knowing how to sew a seam—whether by machine or by hand—is incredibly useful. If you’re in the US and into DIY, looking to save money, or even thinking about dipping a toe into fashion design, being able to sew a clean, strong seam opens a lot of doors. Whether you’re repairing your favorite jeans or making holiday gifts from scratch, this is where it all starts.
And look, I’ve been doing this for years now. Some seams I’ve nailed in one go. Others… not so much. So what I’ve put together here is a practical guide for beginners—no fancy jargon, no perfection pressure—just a real-world, lived-in introduction to sewing seams from scratch.
Contents
- 1 What Is a Seam and Why It Matters
- 2 Tools and Materials You Need (Hand and Machine)
- 3 How to Sew a Seam with a Sewing Machine (Step-by-Step)
- 4 How to Sew a Seam by Hand (Step-by-Step)
- 5 Choosing the Right Seam Type for Your Project
- 6 Common Seam Mistakes and How to Avoid Them
- 7 Tips for Stronger, Neater Seams
- 8 Practical Uses: Fixing Clothes or Making Custom Projects
- 9 Final Thoughts
What Is a Seam and Why It Matters
At its simplest, a seam is where two pieces of fabric are joined together, usually with stitching. But it’s more than just a line of thread. In garment construction, seams define the shape, the strength, and honestly, the success or failure of the whole piece.
I think people often assume seams are just functional. And sure, they are. But seams are also a design element. A curved princess seam shapes a bodice. A flat-felled seam holds together your jeans and keeps the raw edges from fraying. Even the humble straight seam—it’s the backbone of literally every sewing project.
Some of the most common seam types you’ll run into:
- Straight seam (your bread and butter)
- Topstitched seam (adds strength and a nice finish)
- Open seam (pressed apart, great for light fabrics)
- French seam (neat inside and out—my go-to for sheer blouses)
- Overlocked/serged seam (factory-clean, but you can fake it with a zigzag)
Each one has its place, and the more you sew, the more you’ll start choosing seams like a cook chooses spices. It’s intuitive after a while, but a little trial and error comes first.

Tools and Materials You Need (Hand and Machine)
Let’s talk gear. You don’t need a studio full of gadgets, especially not in the beginning. Most of what I use regularly I picked up at Joann or Walmart for under $50 combined. Here’s what you’ll need depending on your method:
Basic Sewing Machine Setup (in the US market):
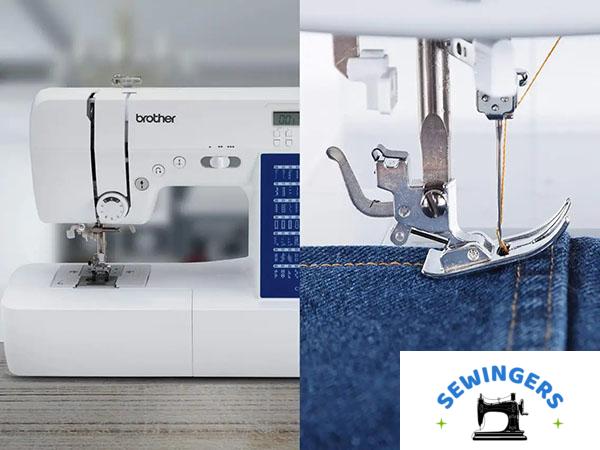
- Sewing machine (I started on a Brother CS6000i—cheap and reliable)
- Machine needles (size 80/12 or 90/14 for most medium-weight fabrics)
- Thread (all-purpose polyester works for almost everything)
- Bobbins (make sure they fit your machine model)
- Seam gauge or small ruler
- Fabric scissors (don’t cut paper with these!)
- Pins or clips
- Iron + ironing board (pressing seams is non-negotiable)
Hand Sewing Essentials:
- Hand sewing needles (sharper ones for woven fabric, ballpoint for knits)
- Thread
- Thimble (optional, but helpful)
- Fabric marker or chalk
- Measuring tape
- Seam ripper (trust me—you’ll need it eventually)
I keep all mine in a plastic tackle box I got on sale. Not glamorous, but it works.
How to Sew a Seam with a Sewing Machine (Step-by-Step)
Sewing a straight seam on a machine might look intimidating, but once you’ve done it a couple times, it clicks. Here’s my step-by-step, beginner-tested and personally refined:
1. Prep your fabric.
Wash it first (pre-shrinking matters), then press it. Lay it flat with the right sides together, aligning the edges.
2. Pin along the edge.
Mark your seam allowance—⅝ inch is standard in US patterns. Use a seam gauge or just eyeball it if you’re feeling brave.
3. Thread the machine.
Threading varies by model, but the main steps are:
- Top thread through guides
- Down the tension disc
- Up the take-up lever
- Down to the needle
Then insert the bobbin into the case below. (I still double-check every time.)
4. Adjust tension and stitch settings.
Start with a 2.5mm stitch length, and keep your thread tension around 4. If the fabric puckers, loosen slightly.
5. Sew the seam.
Place fabric under the presser foot. Lower it. Backstitch 2-3 stitches to lock it in. Sew straight, following the seam guide. Backstitch at the end, too.
6. Press the seam.
Open the fabric and press the seam flat (or to one side, depending on the project). This makes everything look more professional—seriously, don’t skip this.
How to Sew a Seam by Hand (Step-by-Step)
Some days, I just don’t want to drag out my machine. Or I’m fixing something on the go. Hand-sewing still has a place—especially for quick repairs or delicate fabrics.
1. Thread your needle.
Cut about 18–24″ of thread (longer just tangles). Knot the end. You can double it for strength or use a single strand for finer fabrics.
2. Prep the fabric.
Same as machine sewing: right sides together, aligned edges. You can pin it or just hold it in place.
3. Use a running stitch or backstitch.
- Running stitch: In-and-out, like a dashed line. Fast but not super strong.
- Backstitch: Stitch backward into the previous hole, then forward again. It mimics machine stitching and holds up better.
4. Secure the thread.
Knot it at the end or weave it under nearby stitches. For repairs, I sometimes use a double knot and then tuck it under the seam.
5. Press it.
Yes, even with hand stitching—pressing smooths everything out and sets the thread.
Choosing the Right Seam Type for Your Project
Not every seam works for every project. Here’s a quick comparison I use when deciding:
| Seam Type | Best For | Why I Use It |
|---|---|---|
| Straight seam | Almost anything | Simple, fast, easy to finish |
| French seam | Sheers, blouses | Looks clean inside and out |
| Flat-felled seam | Jeans, workwear | Durable and neat—no raw edges |
| Zigzag stitch edge | Knit fabrics or finishing | Adds stretch and prevents fraying |
| Pinked edge | Crafts, non-washables | Super fast, but not very durable |
I don’t follow “rules” strictly. Sometimes I pick a seam because I’m in a rush or out of supplies. That’s okay too.
Common Seam Mistakes and How to Avoid Them
Every beginner makes these—I definitely did.
- Uneven seam allowance: I used painter’s tape on my machine bed to mark a guide.
- Puckering: Usually means your tension’s too high or the stitch length’s too short.
- Skipped stitches: Could be a dull needle or pulling the fabric too hard.
- Thread bunching under fabric: Most times, it’s the bobbin not threaded right.
- Crooked seams: It happens. I just unpick with a seam ripper and try again. No shame.
Give yourself room to mess up. Sewing is a skill you feel in your hands over time.
Tips for Stronger, Neater Seams
A few things I’ve learned that make a big difference:
- Backstitch at the start and end of every seam—it keeps things from unraveling.
- Press every seam, even if it feels tedious. A steam iron changes the game.
- Use matching thread if you care about looks—or contrasting if you’re feeling bold.
- Try a walking foot for slippery fabrics. It feeds layers evenly and reduces bunching.
- Use a seam guide—a magnetic one helped me stay straight for months.
It’s not about being perfect—it’s about building habits that give you better results over time.
Practical Uses: Fixing Clothes or Making Custom Projects
This is where it gets fun. Once you can sew a decent seam, you’ve unlocked a whole world of useful stuff.
- Fix that ripped inner thigh seam on your jeans. I’ve done this so many times, it’s routine now.
- Mend a side seam on a shirt instead of tossing it. Five minutes, and it’s back in rotation.
- Make a basic tote bag out of old denim scraps. I still use mine for groceries.
- Create handmade gifts like fabric pouches or aprons—especially around the holidays.
- Upcycle thrift store finds by taking them in or altering sleeves.
I’ve saved a surprising amount of money this way. And honestly, there’s something satisfying about fixing or making something yourself. It hits differently.
Final Thoughts
Learning how to sew seams—by machine or hand—isn’t flashy, but it’s foundational. And it’s one of those rare skills that can be practical, creative, and weirdly therapeutic all at once. I’ve gone from crooked hand-stitched T-shirts to fully custom outfits with clean finishes, and the thread that connects it all (pun intended) is just… doing the thing. One seam at a time.
If you’re sitting there with fabric in your lap and your first needle threaded—welcome. You’re officially a sewist.