There’s a moment every new DIYer hits — usually around the third time a cut goes crooked — when you realize that the finished project lives or dies by what happens before the scissors or saw ever touch the material. Pattern transfer and cutting aren’t the glamorous part. But they’re the part that separates a clean result from a frustrating mess.
This guide walks through the full process: tools, materials, step-by-step transfer methods, cutting techniques, and the mistakes that tend to cost beginners the most time and money. Whether you’re making a Halloween costume on a tight timeline or building a farmhouse shelf for the living room, the same foundational principles apply.
Contents
- 1 What Pattern Transfer Actually Means (And Why It’s Worth Getting Right)
- 2 Essential Tools You Actually Need
- 3 Choosing the Right Material
- 4 Step-by-Step: How to Transfer a Pattern
- 5 Cutting Techniques That Actually Work
- 6 Comparison: Manual vs. Electric Cutting Tools
- 7 Safety Tips Worth Taking Seriously
- 8 Common Mistakes (And How to Come Back From Them)
- 9 Beginner Project Ideas That Use These Skills
- 10 Keeping Your Tools in Good Shape
- 11 Final Thought
What Pattern Transfer Actually Means (And Why It’s Worth Getting Right)
Pattern transfer is the process of moving a design — from paper, a PDF printout, or a purchased template — onto the material you’re actually cutting. That material might be cotton fabric, birch plywood, craft foam, or vinyl. The method changes depending on what you’re working with, but the goal is always the same: get the lines accurate so the cut follows the design, not your best guess.
A pattern is different from a stencil or a template, though the terms get used interchangeably. A pattern typically includes seam allowances, grainline arrows, and notches — the kind of thing you’d find in a Joann envelope or download from a sewing site. A template is usually a finished shape with no extra allowance built in. A stencil is more of a decorative overlay.
Beginners often skip the grainline step. That’s the arrow on a fabric pattern that tells you how to align the piece with the fabric’s weave. Ignore it and your finished piece might stretch oddly or hang at a weird angle. In woodworking, the equivalent is following the wood grain when cutting to avoid tearout. It’s a small thing that makes a real difference.
The Craft and Hobby Association has noted that material waste from measurement errors is one of the top frustrations among new hobbyists — and it makes sense. A yard of quilting cotton from Joann can run $12–$18. A sheet of good birch plywood at Home Depot might be $40–$60. Getting the transfer wrong doesn’t just look bad. It’s expensive.
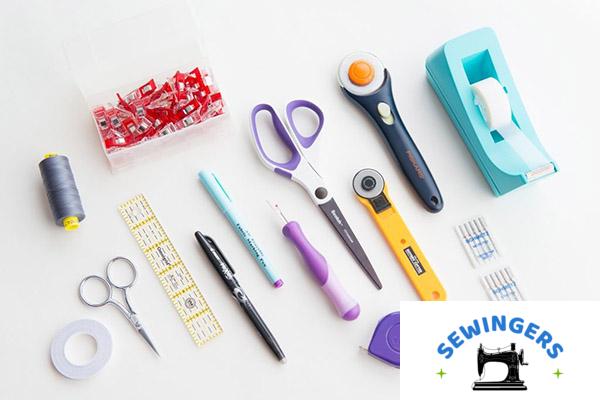
Essential Tools You Actually Need
The good news: you don’t need much to get started. The not-so-great news is that cheap versions of certain tools will make your life harder.
For fabric projects:
- Tailor’s chalk or a chalk wheel — marks wash out and won’t ghost into the fabric permanently
- A tracing wheel and carbon paper — useful for transferring pattern lines through multiple layers
- Fiskars fabric scissors — around $15–$25, and they stay sharp longer than cheap alternatives
- A rotary cutter and cutting mat — Olfa makes reliable versions; the mat protects your table and keeps cuts straight
- Pins or pattern weights — weights are faster; pins work fine but can shift thin fabric
For woodworking and vinyl:
- A Sharpie or marking pencil — dark enough to see through sawdust
- Scotch tape or masking tape — holds paper patterns flat against wood without damaging the surface
- A jigsaw with the right blade — Ryobi and DeWalt both make beginner-friendly options under $80
- Safety glasses and a dust mask — non-negotiable
Brother and Singer both sell beginner sewing kits that include several of these fabric tools bundled together, usually under $50. Cricut machines handle pattern cutting on a different level entirely — more on that in the project ideas section.
One thing worth knowing: rotary cutters need a self-healing cutting mat or they’ll score your table and dull fast. It’s a pair, not optional extras.
Choosing the Right Material
The material shapes every other decision. Here’s a practical breakdown.
| Material | Best For | Common Source | Beginner-Friendly? |
|---|---|---|---|
| 100% cotton fabric | Tote bags, quilts, costumes | Joann, Hobby Lobby, Moda Fabrics | Yes — stable, easy to cut |
| Polyester blend | Throw pillows, decorations | Hobby Lobby, Walmart | Yes, but slippery to handle |
| Birch plywood (1/4″ or 1/2″) | Signs, shelves, frames | Home Depot, Lowe’s | Moderate — needs right blade |
| MDF board | Painted decorations | Home Depot | Yes — cuts cleanly, heavy |
| Adhesive vinyl | Stencils, decals | Michaels, Amazon | Yes with Cricut |
Cotton is genuinely the most forgiving fabric for beginners. It doesn’t stretch much, it holds pins well, and the fabric grain is easy to read. Polyester looks similar but slides around on the cutting mat, which is why your first few projects might come out slightly off if you jump straight to it.
For holiday projects — Thanksgiving table runners, Fourth of July bunting, Christmas tree skirts — seasonal cotton prints are usually well-stocked at Hobby Lobby and Joann starting about 6–8 weeks before the holiday. The selection drops fast, so getting materials early matters.
The American Hardwood Export Council has solid resources if you’re moving into hardwood cutting. For basic beginner woodworking, though, birch plywood is more practical. It’s consistent, widely available, and cuts cleanly with a sharp jigsaw blade.
Step-by-Step: How to Transfer a Pattern
For Fabric
Step 1: Print and assemble the pattern.
Most downloadable patterns come as PDFs sized for U.S. Letter paper (8.5 x 11 inches). Open the file in Adobe Acrobat Reader and print at 100% scale — not “fit to page,” which will shrink everything. Tape the pages together at the registration lines.
Step 2: Cut out the paper pieces loosely.
Don’t cut directly on the lines yet. Leave a little extra margin around each piece so you have room to make adjustments.
Step 3: Press your fabric and lay it flat.
Wrinkles cause inaccurate cuts. A quick press with an iron before cutting saves real headaches later.
Step 4: Align the grainline.
Use a ruler to make sure the grainline arrow on each pattern piece runs parallel to the fabric’s selvage (the finished edge). Pin or weight the pattern piece down.
Step 5: Trace or cut.
For tracing, use tailor’s chalk or a tracing wheel with carbon paper to transfer the seamline and any notches or alignment marks. For direct cutting, keep the paper pattern pinned firmly and cut just outside the seamline — the seam allowance is already included on most commercial patterns.
The Clover brand makes good chalk wheels that don’t smear. A simple Sharpie works for wood but obviously not for fabric you’ll be wearing.
For Wood or Vinyl
Step 1: Print or draw the template.
Tape the printed paper template to the wood surface using Scotch tape or painter’s tape. Make sure it’s lying completely flat — any bubbles will shift your lines.
Step 2: Trace the outline.
Use a Sharpie or marking pencil to trace the pattern edges. Remove the paper before cutting.
Step 3: Mark cut lines clearly.
OSHA recommends stable work surfaces for any power tool use. Set your wood on sawhorses or a solid workbench before picking up the jigsaw.
Cutting Techniques That Actually Work
The most common beginner mistake is cutting too fast. Rushing a cut — especially through fabric or plywood — almost always produces a ragged edge.
For fabric:
- Use long, smooth strokes with fabric scissors rather than short snips
- Rotary cutters work best on straight lines; scissors are better for curves
- Cut with the fabric flat on the mat, not lifted or bunched
- Fiskars and Olfa both make rotary cutters with blade guards — use them
For wood:
- Score along the cut line with a utility knife before using a jigsaw — this reduces tearout on plywood
- Let the blade do the work; don’t push hard
- DeWalt and Ryobi jigsaws both have orbital settings — keep it low for cleaner curves
The old rule of “measure twice, cut once” is genuinely good advice. It’s also worth cutting just outside your line and sanding or trimming to the exact edge rather than trying to hit it perfectly in one pass.
Comparison: Manual vs. Electric Cutting Tools
| Tool | Best Use | Approx. Cost | Precision Level | Beginner Ease |
|---|---|---|---|---|
| Fabric scissors (Fiskars) | Fabric, paper | $15–$25 | High for curves | Easy |
| Rotary cutter (Olfa) | Straight fabric cuts | $20–$30 | Very high | Moderate |
| Cricut machine | Vinyl, thin fabric | $180–$400 | Extremely high | Easy once setup |
| Jigsaw (Ryobi) | Plywood, MDF | $60–$90 | Moderate | Moderate |
| Circular saw (DeWalt) | Straight wood cuts | $100–$200 | High for straight lines | Moderate–Hard |
The Cricut is genuinely worth mentioning separately. It handles pattern cutting on vinyl and lightweight fabric with software precision — no tracing, no scissors needed. For someone making holiday decorations or tote bags regularly, the upfront investment pays off quickly. For a one-time project, scissors and a mat work just fine.
Safety Tips Worth Taking Seriously
This section isn’t here to be preachy. It’s here because rotary cutters and jigsaws send more people to urgent care than most beginners expect.
- Always use a blade guard when your rotary cutter isn’t actively cutting — Olfa blades are razor sharp and will cut through a fingernail without resistance
- Safety glasses are required for any power tool work, including jigsaws; the Consumer Product Safety Commission tracks thousands of tool-related eye injuries annually
- A 3M dust mask (N95 or better) matters when cutting MDF or plywood indoors — the dust is fine and irritating to lungs
- Store blades in cases, especially in households with children; Black+Decker and Fiskars both make tools with locking mechanisms
Electrical tool safety: keep cords away from the cut line, don’t use power tools in damp areas, and unplug before changing blades.
Common Mistakes (And How to Come Back From Them)
The fabric shifted mid-cut. This usually means not enough pins or weights holding the pattern down. Add more pins around the edges next time. For now, check whether the piece is still usable — minor shifts under 1/4 inch often get absorbed by the seam.
The cut went crooked on wood. Score the line deeper with a utility knife and follow it more slowly on a second pass. If the cut is badly off, Gorilla Glue can sometimes salvage pieces, or you recut the piece from new material.
The grainline is off. If you catch it before sewing, recut. After sewing, it depends on how far off — slight grain misalignment on a pillow cover is barely visible; on a structured garment, it matters more.
Pattern pieces don’t match up at the seams. This is usually a printing issue — the PDF was scaled down during printing. Reprint at 100% and check against the test square most patterns include.
Singer and Janome both have good troubleshooting resources on their websites for sewing-specific issues.
Beginner Project Ideas That Use These Skills
- Canvas tote bags — straight cuts, simple seams, done in an afternoon
- Throw pillow covers — forgiving seam allowances, great for practicing zipper insertion later
- Wooden welcome signs — trace a font template, cut with a jigsaw, paint and seal
- Holiday yard signs — plywood cutouts for Christmas, Independence Day, Halloween
- Fabric bunting — triangles cut from a template, no curves involved
Cricut machines shine for the vinyl and paper-layered versions of holiday decor. Brother sewing machines at the entry level (the CS6000i, for example) handle tote bags and pillow covers without issues.
Keeping Your Tools in Good Shape
Scissors dull faster than most people realize. Cutting paper with fabric scissors kills them — keep dedicated pairs for each material. Fiskars sells replacement screws for their scissors, and their sharpener tool runs about $10.
Rotary cutter blades need replacing more often than you’d expect — usually every 2–3 large projects. Olfa replacement blades come in multipacks.
For power tools, WD-40 on metal components prevents rust, especially in garage storage where humidity swings. DeWalt tools come with decent storage cases; use them. The National Safety Council recommends keeping power tools stored and locked away from children regardless of how secure the garage feels.
Home Depot carries most replacement blades, sharpening tools, and storage solutions in-store.
Final Thought
Pattern transfer and cutting are skills that compound. The first time feels slow and uncertain. By the fifth project, your hands know where to hold the scissors, how much pressure to use on a rotary cutter, and how to read a grainline without thinking about it.
The tools don’t need to be expensive. The process doesn’t need to be perfect. It just needs to be deliberate — and that’s something you can build from the very first project.