Regular oiling is one of the simplest things you can do to keep your sewing machine running well — and one of the most skipped. If your machine has been sitting through a dry Arizona summer or cranking through holiday quilt projects, chances are it needs attention. This guide walks you through the full process, from the supplies you actually need to the mistakes that quietly shorten a machine’s life.
Whether you sew twice a year or twice a week, the principles here apply to most home machines — including popular brands like Brother, Singer, and Janome America.
Contents
- 1 Key Takeaways
- 2 Tools and Supplies Needed to Oil a Sewing Machine
- 3 Safety First: Preparing Your Machine
- 4 How to Clean Before Oiling
- 5 Step-by-Step Guide to Oiling a Sewing Machine
- 6 How Much Oil Is Too Much?
- 7 How Often Should You Oil a Sewing Machine?
- 8 Common Mistakes When Oiling a Sewing Machine
- 9 When to Call a Professional in the United States
- 10 Final Thoughts
- 11 FAQ
Key Takeaways
- Always unplug your machine and remove the needle before oiling or cleaning.
- Use only clear, purpose-made sewing machine oil — never WD-40 or motor oil.
- One drop per oil point is usually enough; more causes fabric staining.
- Clean out lint from the bobbin case and feed dogs before applying any oil.
- Light-use machines benefit from oiling every 3–6 months; heavy quilters may need monthly maintenance.
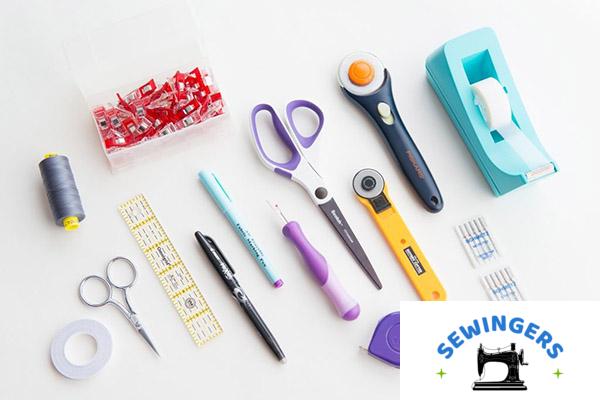
Tools and Supplies Needed to Oil a Sewing Machine
Getting the supplies right matters more than most people realize.
The only oil you want: clear, purpose-made sewing machine oil. It has the right viscosity for the delicate metal components inside your machine — thin enough to reach tight spaces, stable enough not to gum up over time. Most craft stores carry it, and it’s usually under $10.
What you don’t want is WD-40. It’s a degreaser and moisture displacer, not a lubricant — and it can actually strip protective coatings from internal metal parts. Motor oil is too thick and leaves residue buildup that attracts dust. Even olive oil gets sticky. Stick with the proper lubricant for sewing machines.
Here’s a quick look at the supplies that work vs. the ones to skip:
| Supply | Use It? | Notes |
|---|---|---|
| Sewing machine oil (clear) | Yes | The only correct choice |
| WD-40 | No | Damages internal metal parts |
| Motor oil | No | Too thick, causes residue |
| Household cooking oil | No | Turns sticky, attracts lint |
| Microfiber cloth | Yes | Preferred over paper towels |
| Small lint brush | Yes | Comes with most machines |
| Compressed air | Use with caution | Can push lint deeper into the machine |
| Small screwdriver | Yes | For removing the throat plate |
| Vacuum attachment | Yes | Gentler than compressed air |
One note on compressed air: it’s tempting, but blowing lint around inside a machine often makes things worse. A small brush and a vacuum attachment handle dust accumulation more reliably.
Safety First: Preparing Your Machine
This part is short, but don’t skip it.
Unplug the machine from the outlet before touching anything inside. Foot pedal or not, the machine has live electrical components when plugged in. It takes three seconds and eliminates any risk entirely.
Next, remove the needle from the needle clamp. Reaching around inside a sewing machine while a sharp needle is mounted is how people end up with small but memorable injuries. Take it out.
Then remove the thread, lift the presser foot using the presser foot lever, and clear the workspace. You want a stable surface with room to set parts aside — the throat plate, the bobbin case — without losing anything. A folded towel or cutting mat protects the table and keeps small parts from rolling away.
Pull out the instruction manual if you have it. Different machines have different oil points, and the manual is the most reliable source. If you’ve misplaced the manual, most manufacturers like Brother Industries and Janome America offer free PDF downloads on their websites.
How to Clean Before Oiling
Oiling a dirty machine traps lint inside and turns it into a gummy paste around the moving parts. Cleaning first is non-negotiable.
Remove the bobbin and bobbin case. Set them aside. Use a small lint brush to sweep lint away from the feed dogs, the hook race, and the area around the rotary hook. Short, deliberate strokes work better than trying to sweep everything in one go.
Wipe any visible metal parts with a dry microfiber cloth. If there’s old oil residue or thread debris packed into corners, work gently — you don’t want to push lint further into the machine.
Inspect the area for broken thread pieces. They get wrapped around the shuttle hook and cause tension problems that are easy to mistake for oiling issues.
Once the stitch plate and bobbin area look clean, you’re ready to oil.
Step-by-Step Guide to Oiling a Sewing Machine
Here’s where the actual lubrication happens. Work slowly and deliberately.
Step 1: Locate the Oil Points
Refer to your instruction manual for the specific lubrication points on your model. On most mechanical machines, the key areas include:
- The needle bar (where it moves up and down)
- The shuttle hook or bobbin hook assembly
- Any metal-on-metal contact points visible when the throat plate is removed
- The handwheel mechanism, if accessible
Computerized and newer machines sometimes have sealed lubrication systems that don’t require user oiling at all. Check the manual — oiling a self-lubricating machine where it’s not needed can actually cause problems.
Step 2: Apply One Drop Per Point
One drop. That’s usually it. Apply a single drop of sewing machine oil to each lubrication point indicated in the manual. More than that increases the risk of oil residue reaching your fabric.
Avoid plastic gears or plastic components entirely. Oil on plastic can cause swelling or cracking over time, and plastic parts don’t benefit from lubrication the way metal parts do.
Step 3: Turn the Handwheel to Distribute Oil
After applying oil to each point, manually turn the handwheel slowly several times. This works the oil into the rotational mechanism and ensures it reaches the contact surfaces inside. You’ll often hear a slight difference in sound — a quieter, smoother motion — when the oil has distributed properly.
Step 4: Wipe Away Excess
Use a clean microfiber cloth to wipe any visible excess oil from surfaces. Pay attention to the bobbin area and throat plate — oil that drips into the stitch path will reach your fabric.
How Much Oil Is Too Much?
The rule of thumb: one drop per point, then test.
After oiling, thread the machine and run a few stitches on a piece of scrap fabric — cotton muslin is ideal. Check the fabric for any oily spots or faint discoloration. If you see oil marks, you’ve applied too much.
Wipe the needle plate and bobbin area again, run another scrap piece, and repeat until the fabric comes out clean. This usually takes two or three passes at most. Let the machine rest for 5–10 minutes before starting a real project.
Over-oiling is one of the more common sewing machine maintenance errors in home settings, and the fix is straightforward — but catching it before you sew onto good fabric saves a lot of frustration.
How Often Should You Oil a Sewing Machine?
Usage and environment both play a role here, and the answer varies more than most guides admit.
For someone who sews occasionally — a few projects a season — oiling every 3–6 months is a reasonable baseline. For heavier use, like regular quilting or running a small alterations business, monthly oiling starts to make sense.
Climate matters more than people expect. In dry states like Arizona or New Mexico, machines lose moisture faster, and internal friction builds up quicker. In humid states like Florida or Louisiana, lint can compact more densely in the bobbin area. Neither situation is catastrophic, but both suggest checking your machine more regularly than the baseline.
Timing around seasons is also practical. A lot of American sewists ramp up before back-to-school or the Thanksgiving crafting season. Oiling before those heavy-use periods — not during them — keeps performance consistent when it matters.
Always check the manufacturer’s guidance. Brother Industries, Singer Corporation, and Janome America each publish maintenance schedules for their product lines, and some newer models have longer service intervals than older mechanical machines.
Common Mistakes When Oiling a Sewing Machine
A few errors come up repeatedly, and most of them are easy to avoid once you know what to watch for.
Using the wrong oil. WD-40 is the most common substitute, and it’s genuinely damaging. It removes lubrication rather than providing it. Household cooking oils and motor oils leave residue that compounds over time. The only reliable lubricant for sewing machines is purpose-made sewing machine oil.
Skipping the cleaning step. Applying oil over lint doesn’t lubricate — it cements debris into the moving parts. Clean first, every time.
Oiling plastic parts. Moving plastic gears and components don’t need oil and can be harmed by it. Only apply oil to metal-on-metal contact points.
Ignoring the manual. Different machines have different internal geometries. Oiling the wrong points — or missing the right ones — does little good. The instruction manual is the most machine-specific guide available.
Not testing afterward. Running a scrap fabric test catches oil transfer before it ruins real fabric. It takes 60 seconds and prevents a genuinely annoying problem.
One overlooked consequence: improper lubrication can void the warranty on newer machines. Brands like Brother and Singer specify approved maintenance procedures in their warranty documentation. Using the wrong products or methods occasionally creates issues that warranty service won’t cover.
When to Call a Professional in the United States
Home oiling handles routine maintenance, but it doesn’t cover everything.
If the machine makes grinding or clunking sounds that don’t improve after cleaning and oiling, that’s usually a mechanical timing issue — the kind that requires internal calibration by a sewing machine technician. Stitch quality problems that persist after proper maintenance sometimes indicate a motor issue or a timing problem that’s shifted over years of use.
Computerized machines are a separate category. Many of them have sealed internal components and self-contained lubrication systems. Opening them up for home maintenance can create more problems than it solves.
A professional sewing machine service in the U.S. typically runs $75–$150 for a standard tuneup, depending on location and machine complexity. Authorized service centers for Brother Industries, Singer Corporation, and Janome America can be found through the manufacturers’ websites. Annual servicing is worth considering for machines that see regular use — catching a minor mechanical issue early is almost always cheaper than addressing a larger one later.
If a machine hasn’t been serviced in several years and starts showing signs of strain, a professional inspection is a reasonable investment.
Final Thoughts
Oiling a sewing machine isn’t complicated, but it does require a bit of patience and the right supplies. One drop of proper sewing machine oil, applied to the right metal components after a thorough cleaning, does more for long-term performance than most people expect.
The machines that last decades in American households — the ones passed down or still running after years of quilts and holiday projects — are almost always the ones that got regular, basic care. Routine maintenance schedule or not, giving your machine a proper clean and oil a few times a year keeps it running the way it’s supposed to.
FAQ
Can you use WD-40 to oil a sewing machine?
No. WD-40 is a degreaser and moisture displacer, not a lubricant. Using it on a sewing machine removes existing lubrication and can damage internal metal components. Always use purpose-made sewing machine oil.
Where exactly do you oil a sewing machine?
Oil points vary by model, so the instruction manual is the most accurate guide. Common points include the needle bar, the shuttle hook, and other metal-on-metal contact areas visible beneath the throat plate. Avoid plastic parts entirely.
How do you know if you’ve used too much oil?
Run a few stitches on a scrap piece of cotton muslin after oiling. If the fabric picks up oily marks or faint discoloration, there’s excess oil in the machine. Wipe the bobbin area and needle plate, then test again until the fabric comes out clean.
Do all sewing machines need to be oiled?
Not always. Some newer computerized machines — including certain Brother and Janome models — have sealed, self-lubricating systems that don’t require user oiling. Check the manual before applying any oil; oiling a self-lubricating machine can cause problems.
How often should a sewing machine be professionally serviced?
For regular home use, an annual or biennial professional service is a reasonable baseline. Heavy users — quilters, small business owners — often benefit from yearly servicing. A standard tuneup at a U.S. authorized service center typically costs $75–$150.
What happens if you never oil your sewing machine?
Over time, metal-on-metal friction causes wear on the internal components. The machine may run louder, stitches become inconsistent, and parts wear out faster than they should. In moderate use machines, skipping oil for years can lead to repair costs that far exceed the price of basic maintenance.
Is it safe to oil a computerized sewing machine at home?
It depends on the model. Some computerized machines have accessible oil points; others are fully sealed. Attempting to open sealed machines at home risks damaging internal calibration or voiding the warranty. When in doubt, consult an authorized service center for the specific brand.