Embroidery sewing machines are a game-changer for anyone looking to add a personal touch to their projects, whether you’re a seasoned hobbyist or a beginner just starting out. These machines are designed to make embroidery accessible and enjoyable while maintaining an effortless blend of style and simplicity. With their user-friendly features, modern embroidery machines allow you to create intricate designs with ease, transforming everyday fabrics into beautifully embroidered masterpieces. The appeal lies in their ability to simplify complex tasks, providing beginner-friendly options that cater to those just learning the craft, yet offering enough advanced features for more experienced sewists.
The beauty of modern embroidery sewing machines is in their versatility and compact design, making them perfect for home use. For hobbyists or those with limited space, these machines are easy to set up and use, providing a convenient way to enhance clothing, accessories, or home décor. Stylish yet simple, these machines enable users to express their creativity without feeling overwhelmed by complicated settings. Whether you’re looking for a machine with intuitive controls, customizable stitch patterns, or an easy-to-use interface, the best embroidery machines for beginners offer everything you need to bring your design ideas to life at home. With the right machine, adding intricate and stylish embroidery to your wardrobe or personal projects is just a few simple steps away.
Contents
Why Choose an Embroidery Sewing Machine?
Embroidery sewing machines are a game-changer for anyone looking to elevate their personal style through customized designs. Whether you’re an avid crafter or a small business owner, these machines offer a multitude of benefits that can save you time while ensuring high-quality results. One of the most appealing features is their ability to deliver precision stitching, making intricate patterns and custom designs look professional every time. With advanced features like easy-to-use controls, quick stitching speeds, and built-in design options, these machines streamline the embroidery process, allowing you to focus more on creativity and less on labor-intensive tasks.
Beyond efficiency, an embroidery sewing machine allows for incredible versatility in personalizing your garments, home decor, and accessories. You can add unique monograms, logos, or detailed artwork to almost any fabric with ease. The ability to create bespoke pieces means that you’re no longer limited to store-bought designs, and every item can reflect your personality and style. Whether you’re looking to create one-of-a-kind gifts, start a small business, or simply enhance your wardrobe, an embroidery sewing machine can help turn your creative ideas into reality with unmatched precision and speed.

Key Features to Look for in a Simple Yet Stylish Embroidery Machine
When searching for a simple yet stylish embroidery machine, it’s essential to find the right balance between ease of use and attractive design features. One of the key factors to consider is automatic threading, which eliminates the hassle of manually threading the needle, making the machine much more user-friendly. A machine with built-in designs offers a variety of patterns and motifs, reducing the need for complicated software and expanding creative possibilities without overwhelming beginners. Many modern embroidery machines also feature an intuitive LCD screen user interface, allowing users to easily adjust settings, preview designs, and navigate the machine’s functions. These automatic features save time and ensure that both novice and experienced users can create professional-looking results without frustration.
Durability and ease of maintenance are also crucial elements of a high-quality embroidery machine. Look for machines that are designed to withstand frequent use and offer features like durable construction and easy-to-clean parts. Machines with size options for embroidery hoops can provide versatility, allowing for larger designs or more intricate work depending on your needs. Additionally, a stylish design is important, as a sleek and modern look can complement your workspace, while still providing the functionality you require. Whether you’re a beginner or an experienced embroiderer, a machine that combines these features will allow you to enjoy both simplicity and style in your embroidery projects.
5 Top-Rated Embroidery Sewing Machines With Reviews
1. DONYER POWER Electric Sewing Machine

The DONYER POWER Electric Sewing Machine is a compact, lightweight, and portable option for everyday sewing needs and DIY projects. While not meant for professional use, it’s an excellent choice for beginners looking to learn sewing and embroidery.
Key Features:
- 12 built-in stitch patterns
- Two speed options (high and low) to adjust for fabric thickness
- Built-in needle threader for easy threading
- Foot pedal for increased pace and efficiency
- Adjustable stitch length and width
- Free arm for sewing rounded seams (cuffs, collars)
- Onboard storage compartment for accessories
- 1-year limited warranty
Pros:
- Versatile for crafts, minor projects, and embroidery
- Beginner-friendly and simplified for learning
- Portable and space-saving design
Cons:
- Limited customer support channels
- Some concerns about usability for both novices and experts
While the DONYER POWER Electric Sewing Machine may not be suitable for all skill levels, it offers a range of features and versatility for those interested in sewing, embroidery, and DIY projects, especially beginners.
2. Brother Computerized SE1900 Sewing and Embroidery Machine

The Brother SE1900 is a versatile sewing and embroidery machine that blends advanced features with user-friendly design. Highlights include:
- 5″x7″ embroidery field for larger patterns with minimal rehooping
- LCD screen to preview designs before stitching
- 240 built-in stitches and 138 embroidery designs across various themes
- 7 embroidery fonts with editing options like resizing and rotating
- 10 styles of 1-step automatic buttonholes
- Free motion quilting capability with drop feed feature
- Automatic needle threader for quick threading
- LED workspace light for dark fabrics
- 8 accessory feet for specialized techniques
- USB port to import designs (USB not included)
- 3.2″ color touch LCD to select thread colors
With its wide range of customization options, the SE1900 encourages creativity for sewists and embroiderers of all levels. Backed by a 25-year warranty and Brother’s technical support.
Pros:
- Expansive workspace and design options
- User-friendly features like auto needle threader and LED light
- Quilting and free-motion capabilities
- Comprehensive accessory kit
Cons:
- Higher price point, though justifiable for business use
- Some noise issues reported, but overall positive reviews
The SE1900 offers sophisticated sewing technology balanced with an intuitive experience, ideal for pursuing embroidery, sewing, and quilting projects professionally or recreationally.
3. Brother Embroidery Machine, PE535

The Brother PE535 is a feature-rich yet budget-friendly embroidery machine ideal for beginners and experienced sewists alike. Key highlights include:
- 80 built-in designs, borders, and fonts to personalize garments
- 4″x4″ embroidery field with grid sheet and alignment tools
- Automatic needle threader for easy threading
- USB port to import design files (USB not included)
- 3.2″ Sew Smart color LCD touchscreen
- Access to ibroidery.com with thousands of designs
- 9 lettering fonts (6 English, 3 Japanese) with editing options
- Create embellishments, lace designs, embroidery on denim
- Make customized gifts for special occasions
- Preview designs in color before stitching
- Bilingual manual and instructional DVD included
- 25-year limited warranty with free technical support
Pros:
- Versatile design capabilities at an affordable price
- User-friendly features like auto needle threader
- Customize text/lettering with font options and editing tools
- Expand design library via ibroidery.com access
- Well-suited for all skill levels
Cons:
- No major cons reported by users
The PE535 from trusted brand Brother offers an accessible entry into machine embroidery, packed with creative tools and guidance to embellish all your sewing projects.
4. Brother PE770 Embroidery-Only Machine
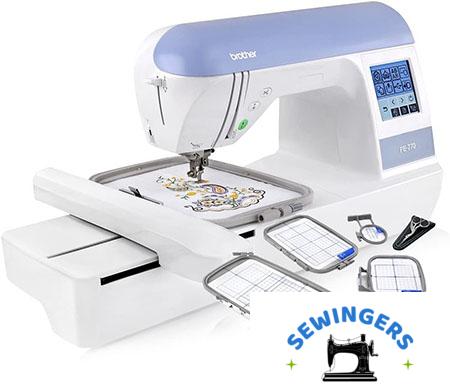
The Brother PE770 is a dedicated embroidery machine with an expansive 5″x7″ field, making it ideal for larger patterns, monogramming, and combined designs with less re-hooping. Key features include:
- 136 built-in embroidery designs across various styles
- 6 lettering fonts
- 10 frame shapes and 12 border styles for embellishments
- Built-in memory card slot for additional design libraries (cards sold separately)
- Backlit LCD touchscreen for editing designs (resize, rotate, mirror, etc.)
- Automatic needle threader and quick-set bobbin
- Auto thread trimmer for clean finishes
- Access to iBroidery.com for downloadable designs
- Includes 5×7″ hoop, embroidery arm, accessories, manual, and 25-year warranty
Pros:
- Large embroidery field accommodates bigger projects
- Extensive design library with editing capabilities
- User-friendly features like auto needle threader and bobbin winding
- Comprehensive accessory bundle
Cons:
- Some users reported minor bobbin setup issues, but resolved with tech support
- One user claimed missing accessories in their package
Overall, the PE770 seems to offer versatile embroidery options, automated convenience features, and design customization tools, making it a capable machine for dedicated embroidery enthusiasts.
5. Brother Embroidery PE550D Machine
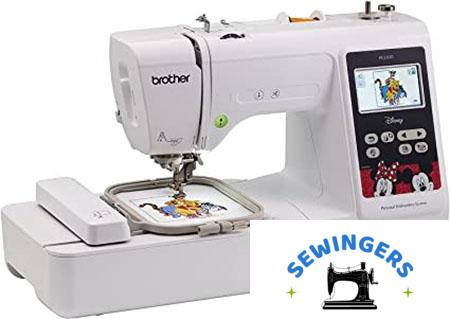
The PE550D is a budget-friendly, dedicated embroidery machine with a 4″x4″ field ideal for daily embroidery needs. Key features include:
- 125 built-in designs including 45 Disney designs, florals, lace, borders, kids/holiday themes
- USB port to import additional designs
- Automatic needle threader for easy threading
- 3.2″ color LCD touchscreen to preview designs
- Editing capabilities like resizing, rotating, mirroring
- 6 embroidery lettering fonts with text editing options
- Includes 4×4″ hoop, embroidery foot, tools/accessories, manual
- 25-year limited warranty
Pros:
- Extensive built-in design library with Disney designs
- User-friendly auto needle threader and touchscreen editing
- Import capability via USB port
- Ample accessories and comprehensive warranty
Cons:
- Limited 4×4″ field may be small for some projects
- Dedicated embroidery use only, no sewing capabilities
- Some quality control issues reported by a few users
Overall, the PE550D offers a wide range of embroidery designs and user-friendly features at an affordable price point, making it a viable option for those focused primarily on embroidery rather than sewing.
Maintenance Tips for Embroidery Machines
Proper maintenance is essential to ensure the longevity and optimal performance of your embroidery machine. One of the most important maintenance tasks is regular cleaning. Dust, lint, and fabric fibers can accumulate in the machine’s moving parts, leading to malfunctions and reduced stitching quality. To keep your machine running smoothly, use soft brushes and vacuum attachments specifically designed for cleaning embroidery machines. Make sure to regularly remove lint from the bobbin area, under the needle plate, and around the feed dogs. This will help prevent blockages and keep the machine in top condition for longer periods. Additionally, needle care is crucial. Always use the appropriate needles for the fabric type, and replace them when they become dull or damaged.
In addition to cleaning, oiling your embroidery machine is an essential step in maintaining its performance. Check the machine’s manual for the recommended oiling points, and use the correct lubricant to avoid clogging or damaging internal parts. This simple routine can help keep the moving components operating smoothly, preventing wear and tear over time. Proper storage is equally important.
When not in use, always store your embroidery machine in a dust-free environment and cover it with a protective storage cover to shield it from dirt and moisture. Regular routine checkups and timely troubleshooting of any minor issues will also help avoid major problems down the road. With these easy maintenance practices, you can ensure that your embroidery machine continues to perform at its best for years to come
Conclusion
In conclusion, finding a stylish yet simple embroidery machine is all about selecting a model that aligns with both your creative goals and practical needs. A great machine combines ease of use, reliability, and the ability to produce unique designs that reflect your personal style. Whether you’re just starting out or you’re an experienced embroiderer, the right embroidery machine should offer a balance of automatic features, user-friendly controls, and built-in patterns that allow you to express your creativity without overwhelming complexity. By choosing a machine that offers both style and simplicity, you’ll be able to effortlessly create beautiful, customized embroidery pieces that complement your aesthetic.
Moreover, when making your decision, consider factors such as cost-effectiveness, the durability of the machine, and overall user satisfaction. It’s important to choose an embroidery machine that not only meets your functional needs but also enhances your sewing experience, providing you with a machine you can rely on for years to come. By keeping these considerations in mind, you can find an embroidery machine that helps you stay stylish while ensuring a seamless, enjoyable sewing journey. Whether you’re making personal gifts, custom clothing, or just exploring your creative side, the right embroidery machine will elevate your craft with ease and elegance.