A loud clutch motor changes the whole mood of a sewing room. The table vibrates, the motor hums nonstop, and delicate stitching turns into a battle with speed control. That setup still exists in plenty of garages, tailoring rooms, and upholstery shops across the United States. Then a servo motor gets installed, and suddenly the machine feels calmer. More precise. Less exhausting after a long afternoon of hemming denim or feeding heavy canvas through an industrial walking foot.
That difference catches many sewists off guard.
A sewing machine servo motor gives you adjustable speed, lower electricity use, and quieter operation compared to traditional clutch motors. For home-based businesses especially, that quiet matters more than expected. A machine running at 9 p.m. in a spare bedroom feels very different when the motor isn’t roaring beneath the table.
This guide compares the 7 best sewing machine servo motors for 2026 based on torque, smoothness, reliability, price, and real-world usability for American sewing setups.
Contents
- 1 Why Choose a Sewing Machine Servo Motor?
- 2 Comparison Table: 7 Best Sewing Machine Servo Motors
- 2.1 1. Genuine Consew CSM1000 Sewing Machine Motor
- 2.2 Best Overall for U.S. Industrial Use
- 2.3 Best For
- 2.4 2. Consew Industrial Sewing Machine Servo Motor CSM1001
- 2.5 Best for Precision Control
- 2.6 3. REX Industrial Sewing Machine Servo Motor 550 Watts
- 2.7
- 2.8 Best Value for Power
- 2.9 4. Enduro SM-550 Sewing Machine Motor
- 2.10 Best for Quiet Operation
- 2.11 5. FESM 550C Sewing Machine Clutchless Servo Motor
- 2.12 Best Clutch Motor Replacement
- 2.13 6. Morphorn CS1000 Sewing Machine Servo Motor
- 2.14 Best Budget-Friendly Option
- 2.15 7. Sewtco Industrial Sewing Machine Servo Motor
- 2.16 Best for DIY Installation
- 3 How to Choose the Right Sewing Machine Servo Motor
- 4 Servo Motor vs. Clutch Motor: What’s Better?
- 5 Final Thoughts: Which Sewing Machine Servo Motor Is Best?
- 6 Sources
Why Choose a Sewing Machine Servo Motor?
Older industrial sewing machines often came with clutch motors. Those motors work, and plenty of upholstery shops still use them daily, but they behave like old pickup trucks: powerful, noisy, and not especially refined.
Servo motors changed the experience.
Instead of spinning constantly, a servo motor activates only when you press the foot pedal. That single change reduces noise dramatically and cuts energy use by roughly 60% to 70% according to industrial motor efficiency studies [1].
In practice, several things become obvious almost immediately:
- Stitching starts smoother at low speeds
- Corners become easier to control
- Thick materials feel less intimidating
- The sewing room stays cooler during long sessions
- Family members stop complaining about noise through the walls
And honestly, the noise difference surprises most people more than the speed control.
A quiet sewing machine motor matters in American homes where sewing spaces often share walls with bedrooms, kitchens, or attached garages. A clutch motor can sound aggressive even while idle. Servo motors stay nearly silent until sewing begins.
Another detail rarely discussed enough involves fatigue. Less vibration under the table changes how your legs and feet feel after several hours. Small thing. Big difference by the end of the week.
Common Benefits of Servo Motors
| Feature | Real-World Benefit |
|---|---|
| Adjustable RPM | Better control on curves and detailed seams |
| Low noise output | Easier late-night sewing sessions |
| Higher torque at low speed | Cleaner stitching through leather or canvas |
| Reduced heat | More comfortable workspace |
| Lower energy use | Smaller electricity costs over time |
Some users pair servo motors with a speed reducer for extra control on leatherwork or thick upholstery. That setup slows the machine further while increasing torque, which helps when sewing belts, bags, and layered materials.
Comparison Table: 7 Best Sewing Machine Servo Motors
| Rank | Servo Motor | Best Feature | Rating |
|---|---|---|---|
| 1 | Genuine Consew CSM1000 Sewing Machine Motor | Best overall performance | 9.9/10 |
| 2 | Consew CSM1001 Servo Motor | Precision speed control | 9.8/10 |
| 3 | REX Industrial Servo Motor 550W | Best value for power | 9.8/10 |
| 4 | Enduro SM-550 Sewing Machine Motor | Ultra-quiet operation | 9.5/10 |
| 5 | FESM 550C Clutchless Servo Motor | Strong clutch replacement | 9.5/10 |
| 6 | Morphorn CS1000 Servo Motor | Budget-friendly choice | 9.1/10 |
| 7 | Sewtco Industrial Servo Motor | Simplified installation | 9.1/10 |
A pattern starts showing up across this list. Most high-performing motors sit around 550 watts because that range balances power, efficiency, and compatibility with common industrial sewing machines in the U.S.
Bigger numbers don’t always sew better. Sometimes they just sew faster than necessary.
1. Genuine Consew CSM1000 Sewing Machine Motor


Best Overall for U.S. Industrial Use
The Genuine Consew CSM1000 consistently lands near the top because it avoids the usual trade-offs. Plenty of servo motors are quiet but weak at low speed. Others have strong torque but rough pedal response. This model feels balanced.
Key features include:
- 550W motor output
- Adjustable speed settings
- Quiet operation
- Strong low-speed torque
- Compatibility with most industrial sewing machines
Leatherworkers and upholstery shops tend to appreciate how stable the motor feels under heavier loads. Thick vinyl and layered canvas expose weak motors quickly. The CSM1000 stays controlled instead of jerking forward unpredictably.
That smoothness matters more than raw speed.
Another advantage involves long-term reliability. Consew motors have a reputation for surviving years of commercial use without developing inconsistent pedal response or overheating issues. Repair shops across the U.S. commonly stock parts as well, which becomes important once equipment ages past warranty periods.
Best For
- Upholstery shops
- Leather crafting
- Small apparel factories
- Heavy-duty industrial sewing
2. Consew Industrial Sewing Machine Servo Motor CSM1001

Best for Precision Control
Some sewing projects demand slower, more controlled stitching. Wedding alterations, decorative topstitching, and detailed denim repairs punish motors with touchy acceleration.
The Consew CSM1001 handles precision exceptionally well.
Features include:
- Digital speed display
- Needle positioning system
- Excellent low-speed torque
- Responsive foot pedal control
Needle positioning sounds technical until daily sewing enters the picture. Then it becomes addictive. The needle automatically stops in a consistent up or down position, which saves time while pivoting fabric or trimming threads.
That convenience feels minor during the first week. A month later, older setups suddenly feel clumsy.
This motor works especially well for alteration businesses where precision matters more than maximum throughput.
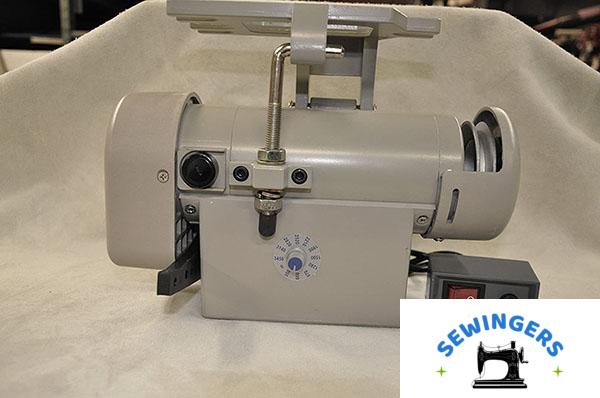
3. REX Industrial Sewing Machine Servo Motor 550 Watts
![]() Best Value for Power
Best Value for Power
The REX 550W motor hits a sweet spot for budget-conscious buyers who still want reliable industrial performance. Plenty of affordable servo motors exist online, but some develop inconsistent speeds or weak torque after extended use.
The REX avoids most of those issues.
Key highlights:
- 550W power rating
- Adjustable RPM settings
- Straightforward installation
- Affordable pricing under $200 USD
A noticeable strength involves startup smoothness. Cheap motors sometimes “jump” when pressure hits the foot pedal. That abrupt motion can ruin detailed stitching instantly. The REX feels more refined than expected at its price point.
For small businesses watching equipment costs carefully, this model often delivers enough performance without stepping into premium pricing territory.
And realistically, not every sewing setup needs a top-tier commercial motor.
4. Enduro SM-550 Sewing Machine Motor

Best for Quiet Operation
Noise becomes exhausting over time. That realization usually arrives after several consecutive production days.
The Enduro SM-550 focuses heavily on smooth and quiet performance. It starts gently, runs with minimal vibration, and avoids the high-pitched whine common in cheaper servo motors.
Main features include:
- Smooth startup
- Durable outer casing
- Reduced vibration
- Consistent speed control
Quilters and home-based sewing businesses tend to gravitate toward this model because quieter motors simply feel better inside residential spaces. The machine still sounds industrial, but the harsh mechanical edge disappears.
One limitation appears with extremely thick materials. While capable, the Enduro performs best with medium-weight fabrics rather than dense leather stacks or heavy saddle work.
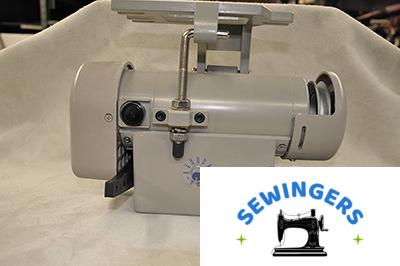
5. FESM 550C Sewing Machine Clutchless Servo Motor![]()

Best Clutch Motor Replacement
Older American-made industrial sewing machines often remain mechanically excellent even after decades of use. The weak point usually becomes the original clutch motor underneath the table.
That’s where the FESM 550C fits nicely.
Features include:
- Energy-efficient operation
- Strong torque delivery
- Easy speed adjustment
- Simple retrofit compatibility
Replacing a clutch motor with a servo setup changes how vintage industrial machines behave. Suddenly the machine becomes manageable at low speed instead of racing uncontrollably through seams.
That transition feels especially dramatic on older Singer, Juki, and Consew industrial models.
The FESM 550C handles retrofit installations well because mounting and adjustments stay relatively straightforward compared to some digital-heavy systems.
6. Morphorn CS1000 Sewing Machine Servo Motor
Best Budget-Friendly Option
Budget motors usually involve compromise somewhere. Sometimes it’s noise. Sometimes durability. Sometimes inconsistent speed control.
The Morphorn CS1000 lands somewhere in the middle.
Its strengths include:
- Affordable pricing
- Lightweight construction
- Basic adjustable speed settings
- Beginner-friendly controls
For someone experimenting with industrial sewing for the first time, this motor makes sense. It covers the essentials without demanding premium pricing.
There are limits, though.
Heavy daily commercial use may expose durability concerns faster than higher-end models. The controls also feel simpler and less refined than Consew systems. But for hobbyists, Etsy sellers, and occasional production work, those trade-offs often feel reasonable.
Especially during early setup stages when budgets disappear quickly into tables, needles, thread, and machine maintenance.
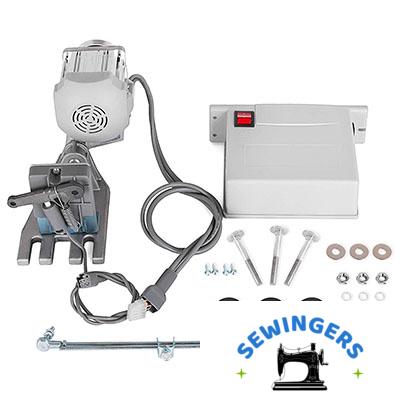
7. Sewtco Industrial Sewing Machine Servo Motor![]()
Best for DIY Installation
Some servo motors install smoothly. Others become an afternoon-long frustration involving brackets, confusing instructions, and awkward belt adjustments.
The Sewtco motor keeps things simpler.
Main advantages include:
- User-friendly mounting
- Adjustable speed control
- Reliable operation
- Good compatibility with industrial tables
This model appeals strongly to home users installing equipment independently. The setup process feels approachable even without extensive mechanical experience.
A common pattern appears among small online sellers and hobby businesses: upgrading from a domestic sewing machine into industrial equipment gradually. The Sewtco fits comfortably into that transition phase because it avoids unnecessary complexity.
Not flashy. Just practical.
How to Choose the Right Sewing Machine Servo Motor
Buying the “best” servo motor depends heavily on what actually gets sewn day after day.
A quilting studio has different needs than a leather workshop. Same with denim repair versus lightweight garment production.
Several factors matter most.
Power Range
For most industrial sewing tasks, 400W to 750W works well.
- 400W–550W: garments, quilting, alterations
- 550W–750W: upholstery, canvas, leather
Higher wattage helps maintain torque through thicker materials. But excessive power can feel difficult to control for lighter fabrics.
Voltage Compatibility
Most U.S. sewing setups use standard 110V outlets. Thankfully, many modern servo motors support direct compatibility without additional converters.
Still worth checking before ordering. Especially with imported motors.
Adjustable Speed Control
This feature changes sewing accuracy dramatically.
Being able to reduce maximum RPM helps beginners gain confidence while also improving precision on detailed stitching jobs. Some motors offer digital controls, while others rely on analog dials.
Digital systems feel cleaner, though simpler dials sometimes prove more durable long term.
Noise Level
A quiet sewing machine motor matters more in residential settings than many buyers initially expect.
Garage workshops, spare bedrooms, and basement studios amplify motor noise differently than commercial spaces. Reduced vibration also helps nearby shelving and tables feel less rattly during operation.
Price Range
Most quality servo motors fall between:
| Price Range | Typical Quality |
|---|---|
| $120–$160 | Basic entry-level motors |
| $160–$220 | Reliable mid-range performance |
| $220–$300 | Premium commercial-grade systems |
Spending slightly more often improves pedal response and long-term durability rather than raw power alone.
Servo Motor vs. Clutch Motor: What’s Better?
Clutch motors dominated industrial sewing for decades because they were durable and inexpensive. Many still operate perfectly today.
But comfort changes the conversation.
| Feature | Servo Motor | Clutch Motor |
|---|---|---|
| Noise | Very quiet | Loud |
| Energy Use | Low | High |
| Speed Control | Adjustable | Difficult |
| Heat Output | Minimal | High |
| Beginner Friendly | Yes | No |
A clutch motor feels aggressive from the moment power switches on. Constant spinning creates noise and heat even while idle.
Servo motors respond only when the foot pedal activates. That calmer behavior improves control immediately, particularly for newer industrial sewing users.
Some experienced production operators still prefer clutch motors for extremely high-speed factory work. That preference exists. But for home workshops and small businesses across the U.S., servo motors dominate modern upgrades for practical reasons: quieter operation, lower energy bills, and smoother stitching control.
Final Thoughts: Which Sewing Machine Servo Motor Is Best?
The Genuine Consew CSM1000 stands out as the strongest overall choice for most American sewing setups. It balances torque, quiet operation, reliability, and smooth control better than nearly anything else in its class.
For tighter budgets, the REX 550W delivers impressive value without feeling cheap. Beginners experimenting with industrial sewing may find the Morphorn CS1000 easier on the wallet during early setup stages.
And honestly, that first transition from a loud clutch motor to a modern servo system tends to feel strangely satisfying. The machine becomes easier to trust. Stitching slows down when needed. Corners stop feeling stressful.
Then the sewing room gets quieter. Noticeably quieter.
That part usually sticks with people longer than expected.
Sources
[1] U.S. Department of Energy – Energy Efficiency Improvements in Electric Motor Systems[2] Industrial Sewing Machine Mechanic Trade Publications and Manufacturer Specifications (Consew, Rex, Enduro, Sewtco)


