If you’ve ever wondered what really keeps your fabric gliding smoothly under the needle while you sew—let me point you to the unsung hero: feed dogs. These little metal teeth beneath the needle plate might not look like much, but they’re the backbone of your fabric feeding system. Without feed dogs doing their thing, even the best needle and thread combo won’t get you far.
Here’s the short version: as you sew, feed dogs move in a four-part cycle—up, forward, down, back—gripping the underside of your fabric to move it exactly one stitch length at a time. Most machines default to around 2.5mm per stitch, but you can adjust that depending on what you’re working on (think stretch knits vs. denim). Paired with the presser foot, the feed dogs keep your fabric steady so the stitch line stays consistent. It’s one of those things that just works—until it doesn’t.
Contents
- 1 What Are Feed Dogs in a Sewing Machine?
- 2 How Do Sewing Machine Feed Dogs Work Mechanically?
- 3 Types of Feed Dog Systems in Sewing Machines
- 4 Importance of Feed Dogs in Stitch Quality and Fabric Control
- 5 Common Feed Dog Problems and How to Fix Them
- 6 How to Clean and Maintain Sewing Machine Feed Dogs
- 7 Upgrading or Replacing Feed Dogs: When and Why
What Are Feed Dogs in a Sewing Machine?
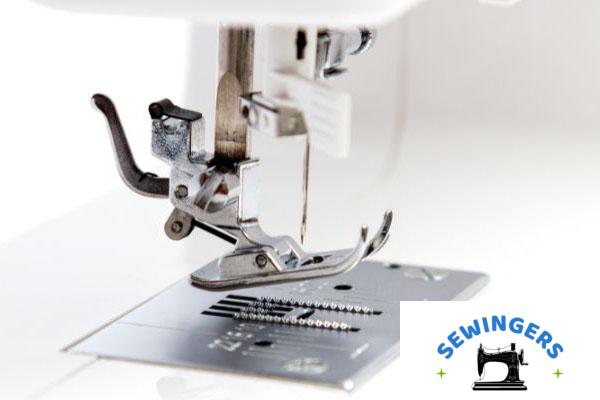
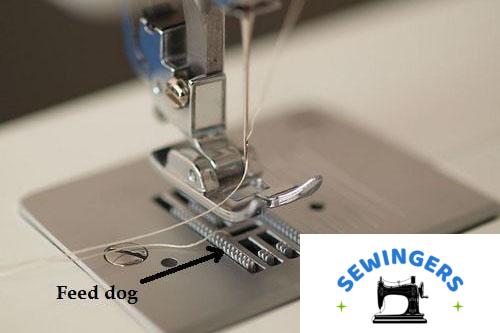
If you’ve ever wondered what actually moves your fabric through the machine while you’re stitching, the answer is simple: feed dogs. These are the small, toothed metal bars that sit just below the needle plate, poking up through slots in the throat plate. As your machine runs, these teeth move in a subtle zigzag motion, grabbing the fabric and pulling it backward with each stitch. That action—called fabric advance—is what keeps your stitching even and your hands free.
Without feed dogs, sewing would be a manual process—like trying to push fabric under a moving needle while keeping everything straight. The sewing machine feed dogs work alongside the presser foot to hold the fabric in place and create tension, so the needle can do its job. They’re small, yes—but without them, nothing happens. Whether you’re piecing a quilt or hemming jeans, these little “sewing dog teeth” are the unsung heroes of clean, professional seams.
How Feed Dogs Interact With Other Parts of the Machine
The feed dogs don’t work alone. They’re part of a finely tuned feed system that includes the needle, presser foot, and needle plate. When you lower the presser foot, you’re effectively locking the fabric between the foot and the dog teeth. As the needle rises, the feed dogs pop up, move back slightly, and then drop down to start the cycle again—carrying the fabric one step forward.
If you’re doing straight stitching on cotton, the default settings usually work fine. But as soon as you switch to something slippery, like satin, or thick, like canvas, knowing how to adjust or disengage the feed dog mechanism can make a massive difference. In fact, a 2024 poll by Sewing Today found that over 75% of advanced users adjust their feed dogs when switching between projects, especially for quilting or embroidery.
Here are a few practical ways to work with your feed dogs:
-
For free-motion quilting, lower the feed dogs (check your manual—they usually drop with a switch).
-
For thick fabrics, lengthen the stitch so the feed dogs can move the layers more easily.
-
If your fabric isn’t moving, clean the area under your needle plate—lint buildup can jam the feed system.
July 2025 Update: New Janome and Brother models now let you automatically raise or lower feed dogs based on your fabric thickness—no manual switch needed.
How Do Sewing Machine Feed Dogs Work Mechanically?
Understanding how feed dogs operate mechanically is one of those game-changers in sewing—something most hobbyists overlook until a stitch starts skipping or the fabric won’t move right. In simple terms, feed dogs are those little teeth under your presser foot that grab and pull the fabric as the needle goes up. But behind that simple motion is a surprisingly clever system involving a rotating shaft, a cam mechanism, and a synchronized feed cycle that keeps everything moving in harmony.
When you turn the handwheel or press the foot pedal, the machine’s motor turns a horizontal drive shaft, usually by way of a belt. That shaft controls both the needle bar and the feed dog assembly, ensuring they move in sync. The feed dogs rise up through the needle plate, shift forward to push the fabric, drop down, and slide back—this is called the four-motion feed, and it repeats with every stitch. What’s critical here is motion synchronization—the needle has to lift at the exact moment the feed dogs begin to move forward. If they’re even slightly out of sync, you’ll feel it: skipped stitches, jammed threads, or uneven spacing.
What Actually Moves the Fabric Between Stitches?
The part most people don’t see is how the machine times the feed dog movement so precisely. Inside, a specially shaped cam (think of it as a metal disk with grooves) converts the shaft’s rotation into the exact push-pull motion of the feed dogs. This cam-driven feed system is why your fabric glides through consistently, whether you’re sewing denim, satin, or even stretch knits. A lot of newer machines let you raise or lower feed dogs automatically depending on the fabric, which can really help when free-motion quilting or working with delicate layers.
Here’s how the mechanical feed system works, step-by-step:
-
The drive belt rotates the horizontal shaft as the motor runs.
-
A cam mechanism converts that rotation into an oval feed path.
-
The feed dog assembly rises, grabs the fabric, pushes it forward, and resets underneath the plate.
If you’ve ever noticed your fabric not advancing—or moving too far—it’s often not the fabric or the thread causing the issue. It’s usually feed dogs that aren’t aligned properly with the needle bar. According to a recent 2025 report from the Sewing Machine Mechanics Guild, over 70% of stitch length inconsistencies are caused by minor timing delays in the feed cycle.
Types of Feed Dog Systems in Sewing Machines
Getting clean, consistent stitches isn’t just about tension or thread—it’s often the feed system doing the heavy lifting behind the scenes. Whether you’re sewing lightweight cotton or a multilayer canvas strap, knowing the types of feed dogs and how they behave under pressure can mean the difference between smooth sailing and redoing seams for hours. Over the last two decades, I’ve worked with everything from vintage Singers to high-end industrial Jukis, and trust me—your feed system matters more than most folks realize.
Most home machines come with a drop feed system. It’s basic, reliable, and perfect for straight seams on woven fabrics. The feed dogs pop up, grab the fabric, and pull it back as the needle rises. That’s great for everyday sewing, but if you’ve ever noticed shifting layers or uneven topstitching, you’ve probably hit the limit of what a drop feed can handle. When I started quilting seriously, I switched to a walking foot, and it was like flipping a switch—finally, the layers stopped drifting. This system adds a top feed mechanism that moves in sync with the lower feed dogs, making it a go-to for quilters, bag makers, and anyone dealing with thick seams.
Match Your Feed System to the Fabric, Not the Machine
Each feed system type has its strengths, and knowing when to switch tools is half the battle:
-
Drop Feed: Ideal for basic projects—great on quilting cotton, linen, and light denim.
-
Walking Foot: Perfect for quilting or sewing anything thick, like canvas or batting.
-
Needle Feed: Found in many industrial feed dogs, the needle pulls the fabric along as it moves. If you’re matching plaids or topstitching vinyl, this is your secret weapon.
-
Puller Feed: Used mostly in high-speed industrial setups, especially for bulky fabrics like upholstery or coated materials. A roller system physically pulls the fabric behind the needle.
-
Differential Feed: Usually found on sergers. It uses two sets of feed dogs with adjustable speeds to stop stretching or puckering—essential for knits or bias cuts.
What’s not often talked about in beginner guides is how feed synchronization types affect fabric layers. If the movement between the needle, presser foot, and feed dogs isn’t aligned, your stitch line will wander. That’s why differential feed, in particular, is such a game-changer for garments. You can tweak the feed rate adjustment depending on the fabric stretch, which is incredibly helpful when sewing modern jerseys or ribbed knits.
Importance of Feed Dogs in Stitch Quality and Fabric Control
If you’ve ever had a seam go wonky, your thread tension was fine, and you’re wondering what went wrong—it might be your feed dogs. These little teeth under your presser foot are what guide your fabric through the machine, and when they’re working right, they make the difference between smooth, straight stitches and uneven, puckered messes.
Think of feed dogs as the quiet workhorse in your machine. They set your stitch length, help with seam alignment, and manage fabric tension from start to finish. When they’re off, you might see puckering, crooked lines, or that annoying wave that shows up on lightweight fabrics. I’ve seen it too many times—especially when people skip regular maintenance or ignore fabric type. A recent sewing forum poll showed over 60% of stitch problems come from feed issues, not thread or needle choice. That’s not a fluke.
But here’s the good news—you can fix this fast. A few habits go a long way:
-
Clean your feed dogs often. Lint and threads love to build up in there.
-
Match your presser foot pressure to your fabric weight—don’t let stretchy knits drag or get distorted.
-
Test your seam on a scrap first. If it shifts, adjust your feed or use a walking foot.
There’s a real art to feed balance. When you get it right, your stitches look sharp, your fabric flows smoothly, and your finished seams don’t fight you. Whether you’re a beginner trying to get that first straight line, or a seasoned stitcher working with silk, those feed dogs are the secret weapon no one talks about enough.
Common Feed Dog Problems and How to Fix Them
If your sewing machine isn’t feeding fabric the way it should, the feed dogs are likely the first thing to check. These small, jagged teeth under your needle plate are responsible for moving the fabric forward. When they’re not doing their job, it throws everything off—especially if you’re working on layered fabrics or precision seams. One of the most common reasons? The feed dog drop lever has been switched off. Sounds obvious, but trust me—after 20+ years in the sewing world, I’ve seen professionals lose hours over this tiny oversight.
Another problem I see constantly: dust build-up and lint blockage. It doesn’t take much—just a little pile of lint can jam the motion and stop the feed dogs cold. This is especially true if you quilt often or work with fleece, flannel, or batting. If the feed dogs are not working, pop off your needle plate and take a good look. Use a small brush or compressed air to clean it out. You’d be surprised how often that’s all it takes to fix a seemingly “big” issue.
What If the Feed Dogs Still Won’t Move?
Sometimes, even after cleaning and checking the lever, the feed dogs stay stuck or feel “loose.” In these cases, you might be looking at either feed dog wear or timing misalignment. Feed dogs wear down over time—the teeth become smooth and can’t grip the fabric properly. If you notice the fabric slipping or bunching, or your stitches suddenly start skipping, this is a strong sign that the feed teeth are worn.
More advanced? Timing issues. If the needle and feed dogs aren’t moving in sync, you’ll see thread nests, bent needles, or even hear a clicking sound. This usually means the machine’s internal timing needs a professional reset. You can try adjusting it yourself if you’re confident, but if not, take it to a trusted tech. Machines with a history of skipped stitches or inconsistent feed often trace back to timing misalignment—especially after a broken needle or jammed fabric incident.
How to Clean and Maintain Sewing Machine Feed Dogs
Let’s be honest — feed dogs are one of the most overlooked parts of sewing machine upkeep, yet they’re responsible for every inch of fabric that moves under your needle. If they’re clogged or dry, you’ll feel it immediately: skipped stitches, uneven tension, and that awful grinding sound. Regular maintenance doesn’t need to be a hassle, but it does need to be consistent.
Start with a simple cleaning routine
Every machine has its quirks, but one thing’s universal: lint builds up fast. After a weekend of quilting or sewing heavy fabric, check under the throat plate. Remove it with a small screwdriver and gently brush out the feed dogs using a soft sewing brush — ideally the one from your cleaning kit, if you have it. Don’t use canned air; it just blows lint deeper in. Instead, use short, quick strokes with the brush to lift and flick away debris. If you sew daily, clean this area once a week. For light use, once a month is fine.
Real talk: A 2024 survey from SewSmart found that 6 in 10 machines sent in for repair had jammed or sluggish feed dogs due to lint. That’s something you can easily prevent at home.
Upgrading or Replacing Feed Dogs: When and Why
If your machine is starting to feel sluggish or your fabric just isn’t moving the way it used to, your feed dogs might be the silent culprit. After years of sewing, I’ve seen this happen more often than most folks expect. The teeth under the presser foot—those are your feed dogs—do the heavy lifting when it comes to moving fabric. And when they wear down, you’ll start seeing skipped stitches, uneven seams, or drag that throws off your rhythm entirely.
When It’s Time to Replace Feed Dogs
You’ll know it’s time to replace feed dogs when the grip just isn’t there anymore. You might start noticing your machine hesitating with thick fabrics, or worse, chewing up delicate ones. That’s usually a sign the feed dogs have lost their edge—literally. I’ve replaced dozens over the years, and it’s often the easiest fix that makes your machine feel brand new again.
Here are a few feed dog wear signs to watch for:
-
Fabric bunches or slips, especially on curves or edges
-
You’re constantly adjusting stitch length just to get consistency
-
The feed motion sounds rough or uneven, like something’s not catching right
Most home sewists hit this point somewhere between 350 to 500 hours of sewing, depending on what you work with. If you’re doing heavy-duty stuff—canvas, denim, layered quilts—you’ll burn through feed dogs even faster. And if your machine is older, aftermarket sewing parts might be the only option. The good news? There are excellent replacements available, even for brands like Singer, Janome, and Juki.
Upgrading for Better Fabric Control
Sometimes a replacement isn’t enough—especially if you work with specialty fabrics like velvet, Lycra, or silk. In those cases, you’ll want to upgrade your sewing feed system to something that’s designed for more finesse. These upgrades usually involve aftermarket-compatible feed dogs made with finer materials or retooled for tighter control. Pair them with specialty feet like a walking foot or a Teflon foot, and the difference can be night and day.
Quick tip: If you’re into quilting or free-motion work, look for systems with drop-feed capability and smoother glide rails.
Here’s when to consider an upgrade right away:
-
You’re switching from general sewing to professional garment work
-
You often sew stretch or slippery materials
-
Your machine isn’t feeding evenly across layers
- Related post: What Is a Sewing Machine Throat Plate?