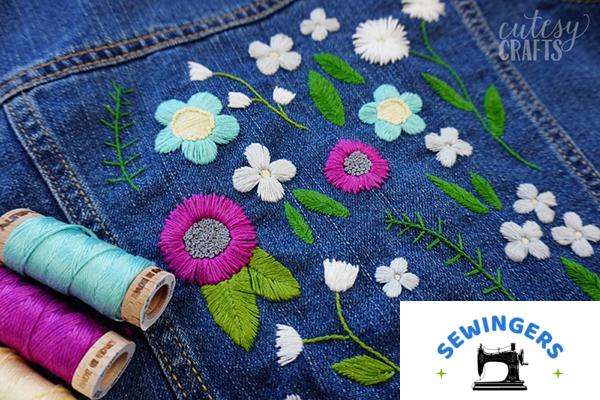
There’s something wildly satisfying about taking a pair of plain jeans and turning them into a walking canvas. Not just for the sake of craft, but because you made them yours. And honestly? That little stitched flower on your back pocket or a constellation creeping up your thigh—it says a lot more than store-bought “distressing” ever could.
In the U.S., this kind of DIY fashion hits differently. You’ll see embroidered denim at farmer’s markets, music festivals, or tucked into boots at small-town parades. It’s got roots in both rugged workwear and self-expression—and now, it’s circling back hard through TikTok, local craft fairs, and upcycled wardrobes.
This guide’s for you if you’ve ever stitched a patch, painted your sneakers, or just want something that looks nothing like what’s on the rack at Target. Whether you’re a seasoned sewer with a full sewing kit or you just picked up your first embroidery hoop from Michaels last week, I’ll walk you through the process of embroidering jeans—from picking the right denim to stitching your first star.
Contents
Key Takeaways
- Mid-weight, non-stretch denim holds embroidery best.
- Back pocket, thigh, or hem? Those areas are embroidery-friendly.
- Basic stitches—like backstitch and chain stitch—work well on denim.
- Use stabilizer behind the fabric to keep stitches secure.
- Wash cold, inside-out, and air dry to keep your embroidery intact.
- Think: Western roses, starbursts, or 70s-style florals for U.S.-inspired looks.
1. Choosing the Right Jeans for Embroidery
Not all jeans are built the same—especially when you’re planning to poke a needle through them a few hundred times.
What I’ve found works best is mid-weight, rigid denim. Think Levi’s 501s or vintage Wrangler. The thicker weave gives your stitches something solid to hang onto. Stretch denim? Meh. You can embroider it, but over time, the thread tends to warp or pop as the fabric stretches.
Let’s compare real quick:
| Denim Type | Works for Embroidery? | Why? |
|---|---|---|
| Rigid denim (100% cotton) | ✅ Best | Strong structure, stable weave |
| Stretch denim (2-5% elastane) | ⚠️ Risky | Threads may warp when worn |
| Lightweight chambray | ❌ Too flimsy | May pucker or distort under tension |
When I plan embroidery, I also look at pocket placement and inseam space. Back pockets are classic, but the outer thigh, cuff hems, and even side seams (if you don’t mind some awkward hoop angles) are great for showcasing stitched designs.
2. Tools & Materials Needed
You don’t need a massive sewing setup—just the right few tools that work specifically with denim.
Here’s what I keep in my jeans embroidery kit:
- Needles: Size 90 or 100 embroidery needles. You’ll need something sharp and sturdy enough to pierce thick fabric. Don’t try with a dainty needle—it will bend.
- Thread: I use DMC cotton embroidery floss, usually 6-strand and separate it down to 2-3 strands for denim. Thicker threads tend to sit nicer on jeans.
- Hoop: A small 4″ or 6″ wooden hoop. Metal hoops slip more on denim.
- Stabilizer: Iron-on or tear-away stabilizer helps prevent your stitches from pulling the fabric. I use Pellon Stitch-N-Tear.
- Marking tool: Water-soluble pens or fabric chalk (I like Clover’s blue pen).
You can find all of these at Joann, Michaels, or even on Amazon if you’re not in a rush. Local craft stores tend to have better in-store help though (and I ask a lot of questions when I shop).
3. Preparing the Jeans
Now, don’t skip this part. I used to get so excited to start stitching, I’d forget the prep—and yeah, that led to puckering and smudged patterns.
Here’s what you’ll want to do:
- Pre-wash your jeans. Especially if they’re new. You want all the shrinkage and dye bleeding out before you start.
- Iron the embroidery area. Use steam, get those wrinkles out. A smooth surface = better pattern transfer.
- Mark your design. I freehand with chalk or trace a pattern using a lightbox (aka my window during the day).
- Apply stabilizer on the inside. Either iron it on or tape it lightly. It keeps your stitches from sinking too deep into the denim.
One trick? Do a thread test on the inside hem first. Just a few stitches to see how your thread and needle behave on that fabric. Denim density varies a lot—what works on one pair might not on another.
4. Beginner-Friendly Stitches for Denim
When I first embroidered jeans, I tried a satin stitch flower on the knee. It took hours, and… honestly? It didn’t hold up. The fabric flexed too much, and the thread loosened.
Since then, here’s what’s actually worked:
- Backstitch – great for outlines, small text, and line art.
- Chain stitch – creates a bolder look and holds up well over time.
- Split stitch – subtle, textured, and surprisingly durable.
- French knots – for dots, stars, or floral accents.
- Satin stitch (sparingly) – fine for pockets, but not for flex zones.
You’ll want tight tension and to keep your needle pull slow and deliberate. Rushing leads to uneven stitch density—and once that thread’s in denim, unpicking is not fun.
5. Stitching the Design
This is the fun part—needle in, thread out, watching the design come alive. I recommend starting with something small like a starburst or floral sprig. Don’t aim for a full mural on your first go (learned that the hard way).
Here’s how I usually go about it:
- Hoop the area (make sure the fabric is taut, not stretched).
- Thread your needle with 2 strands of floss.
- Anchor your first stitch—I use a small knot and double back through it to lock.
- Follow your pattern, keeping consistent spacing and even thread tension.
- Tie off securely on the back, then trim excess thread.
For layered stitching (say, overlapping petals), I start with the background shapes first and build up. Try not to stitch too thick in one spot—it can bunch the denim and create wear points.
6. Post-Embroidery Care Tips
Here’s where a lot of beautifully embroidered jeans start to fall apart—literally.
What’s worked for me:
- Turn jeans inside out before washing.
- Use cold water and skip the heavy-duty cycle.
- Avoid bleach or harsh detergents.
- Air dry flat or hang-dry—no tumble.
- Iron with a pressing cloth, never directly on stitches.
And if threads do come loose? I keep a needle and thread matched to my original design in a zip pouch. Quick fixes are easier when you’ve got your colors on hand.
7. Style Ideas & Inspiration
This is where your embroidered jeans become more than just a project—they turn into a statement piece.
You could lean western with roses climbing your pockets (hello, Yellowstone vibes). Or go coastal boho with stars and moons across the hem. I’ve done little strawberries on one thigh before—got so many compliments at a summer barbecue.
Other ideas:
- 4th of July? Stars on the cuffs.
- Coachella look? Layered florals and desert motifs.
- Gift idea? Custom initials or song lyrics on the back pocket.
You can even match your jeans with embroidered hats or bags—just repeat the motif in a new place. It ties the whole look together.
8. Common Mistakes to Avoid
Embroidery on jeans isn’t hard—but denim doesn’t forgive sloppiness. Here’s what tripped me up early on:
- Using too thin a needle. Denim eats it.
- Forgetting the stabilizer. Led to puckering and saggy stitches.
- Hoop slippage. Especially on stretch denim—watch that tension.
- Pulling the thread too tight. Causes puckering.
- Picking the wrong area. Knees and butt areas = too much movement.
If something’s not sitting right, stop and look at the back. That’s where a lot of problems show up first—knots, loops, misalignment.
Final Thoughts
Embroidery on jeans is part fashion, part therapy. You get to slow down, stitch by stitch, and leave a little bit of yourself on something you’ll actually wear.
You don’t need perfection. Just patience, a few tools, and the willingness to make something your own—even if that means pulling a few threads out along the way.
If you ask me, that’s what makes it yours.