A lot of sewing problems don’t start with the fabric. They start with the seam. A tote bag twists, a curtain panel hangs a little crooked, a pair of jeans feels bulky at the side, and the first instinct is usually to blame the pattern or the machine. Most of the time, the real issue is simpler than that. The seam line drifted, the seam allowance changed halfway through, or the fabric grain shifted before the presser foot even came down.
A seam joins two pieces of fabric along a stitching line, and that single construction detail controls strength, fit, shape, and finish. In American sewing, most commercial patterns use a 5/8-inch seam allowance unless another measurement is printed on the pattern tissue or guide sheet. That one standard shows up everywhere, from Simplicity dresses to Butterick jackets, and it matters more than beginners usually expect.
This guide breaks down how to sew a seam in a way that actually matches real sewing tables in the U.S. That means home machines from Singer, Brother, and Janome. It means thread racks from Coats & Clark. It means supplies picked up at Joann, Michaels, Walmart, or Target on a Saturday afternoon because a project suddenly needed better shears or more pins. And yes, it means the unglamorous truth too: pressing changes everything.
Contents
- 0.1 What Is a Seam in Sewing?
- 0.2 Essential Tools and Materials for Sewing a Seam
- 0.3 Preparing Fabric Before Sewing
- 0.4 How to Sew a Basic Straight Seam Step by Step
- 0.4.1 Step 1: Place the Fabric Right Sides Together
- 0.4.2 Step 2: Align the Raw Edges
- 0.4.3 Step 3: Set the Machine
- 0.4.4 Step 4: Position the Fabric Under the Presser Foot
- 0.4.5 Step 5: Backstitch at the Beginning
- 0.4.6 Step 6: Sew Forward at a Steady Speed
- 0.4.7 Step 7: Backstitch at the End
- 0.4.8 Step 8: Trim the Threads
- 0.5 Common Types of Seams Used in American Sewing Projects
- 0.6 Seam Finishing Techniques to Prevent Fraying
- 0.7 Pressing and Seam Care for Professional Results
- 0.8 Common Seam Mistakes and How to Fix Them
- 0.9 FAQs: How to Sew a Seam
- 1 Conclusion
What Is a Seam in Sewing?
A seam is the line where two pieces of fabric are stitched together. In practice, that sounds almost too basic, but the seam does several jobs at once. It holds fabric together, shapes the project, controls how the finished piece fits, and influences how long the item survives regular use.
The seam line is the exact line of stitching. The seam allowance is the fabric between that stitching line and the raw edge. Those two details get mixed up all the time, especially in beginner sewing guides, and that confusion usually leads to wobbly construction. When the seam allowance changes from 5/8 inch to 1/2 inch without notice, garments come out smaller, corners stop matching, and quilt blocks refuse to line up.
You can see the role of seams in almost every sewing category:
- Jeans rely on reinforced seams for wear and abrasion.
- Quilts depend on consistent seam allowances for accurate piecing.
- Tote bags need strong seams at stress points like handles and boxed corners.
- Home décor items, including curtains and table runners, use seams to keep edges straight and balanced.
The American Sewing Guild regularly emphasizes accuracy and pressing because seam quality affects both appearance and durability [1]. That sounds technical, but it shows up in very ordinary ways. A clean seam lets a pillow cover sit square. A messy seam makes one side pucker for no obvious reason.
Here are a few practical observations that tend to matter more than expected:
- The seam line matters more than sewing speed. Fast stitching looks efficient until the line wanders.
- The raw edge tells part of the story. If edges aren’t aligned before sewing, the seam starts uneven and stays uneven.
- Fabric grain quietly controls the result. A seam sewn off grain often twists, even when the stitching itself looks straight.
Essential Tools and Materials for Sewing a Seam
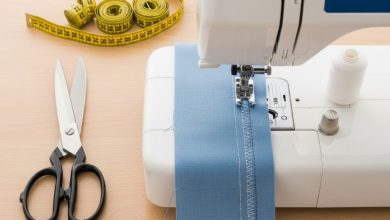
A basic seam needs only a few tools, but tool quality changes the result fast. For most home sewists in the U.S., the core setup includes a sewing machine or hand needle, all-purpose thread, sharp fabric shears, pins or clips, a measuring tool, and a steam iron.
A beginner machine from Brother USA, Singer, or Janome usually falls in the $120 to $300 range. That price point covers most entry-level models sold through large craft retailers. A straight stitch is enough for a plain seam, so the machine doesn’t need dozens of decorative options to be useful. What matters more is stable stitch formation, easy threading, and a seam guide marked clearly on the needle plate.
Thread choice matters too. Polyester all-purpose thread works for most projects because it has strength and flexibility. Cotton thread works well on quilting cottons and some natural-fiber projects, though it’s not always the first choice for heavy-stress seams. Coats & Clark remains one of the most common thread brands in U.S. sewing spaces for that reason: reliability across many fabrics.
The most useful tools for seam construction include:
- Presser foot: Holds fabric steady against the feed dogs.
- Bobbin: Supplies lower thread and affects stitch balance.
- Fabric shears: Cut clean edges without chewing the fabric.
- Measuring tape or seam gauge: Keeps seam allowances consistent.
- Steam iron: Sets stitches and shapes the seam properly.
- Pins or clips: Hold fabric layers together before stitching.
Pressing isn’t optional, even though a lot of people try to treat it like a bonus step. The seam’s final shape doesn’t really show up until heat and steam settle the stitches. That’s where many homemade projects start to look more polished.
Preparing Fabric Before Sewing
Fabric preparation decides whether a seam behaves well or fights back. Before any stitching starts, the fabric needs to be washed, dried, pressed, and aligned. Cotton fabrics from brands such as Robert Kaufman Fabrics, Moda Fabrics, and Springs Creative often shrink, so prewashing removes that surprise early. Skipping that step on garments, placemats, or table runners can lead to distortion after the first laundry cycle.
Straight grain matters more than beginners usually expect. The fabric may look flat on the table, but that doesn’t mean it’s aligned. The selvage edge helps identify grain direction, and fabric pieces cut off-grain tend to twist once sewn. The effect is subtle at first. Then one side stretches, one layer creeps, and the seam starts misbehaving.
A simple prep routine works well for most projects:
- Wash and dry the fabric as the finished item will be cared for.
- Press out wrinkles before measuring or cutting.
- Align fabric on the straight grain.
- Mark pattern lines and seam allowances clearly.
- Pin or clip layers every 2 to 3 inches for straight seams.
That spacing keeps fabrics from shifting too far apart, especially slippery cotton blends or lightweight woven fabrics. For thicker fabrics, clips can feel less awkward than pins. For delicate fabrics, extra pins often prevent a bigger headache later.
A few things tend to help right away:
- Pre-shrinking saves more time than it costs. The delay comes before sewing, not after a project goes wrong in the wash.
- Pressed fabric cuts more accurately. Wrinkled fabric gives false measurements.
- Pinned edges sew straighter. Unpinned confidence has a way of fading about halfway down a long seam.
How to Sew a Basic Straight Seam Step by Step
A basic straight seam is sewn by placing fabric right sides together, aligning the raw edges, stitching at a consistent seam allowance, and backstitching at both ends. This is the seam that shows up everywhere. Once it feels natural, most other seam techniques become much easier to understand.
Step 1: Place the Fabric Right Sides Together
Set the fabric pieces so the finished sides face each other. The wrong side faces out. This feels backward at first, and that’s completely normal. After turning the piece open, the seam ends up hidden inside.
Step 2: Align the Raw Edges
Match the edges carefully and pin along the seam line area. Keep the grain aligned. If one layer is longer by the time the bottom edge is reached, don’t force it under the presser foot and hope for the best. That almost always makes the seam worse.
Step 3: Set the Machine
Thread the machine correctly and use a standard straight stitch. For most woven fabrics, a 2.5 mm stitch length works well. Check the tension dial if stitches looked uneven on the previous seam. Test on scrap fabric first.
Step 4: Position the Fabric Under the Presser Foot
Lower the presser foot and line up the fabric edge with the seam guide on the needle plate. Keep eyes on the guide, not the needle. That small shift in attention usually improves seam consistency almost immediately.
Step 5: Backstitch at the Beginning
Sew forward 3 to 4 stitches, then reverse over those stitches to lock the seam. Backstitching prevents the seam from opening during handling or washing.
Step 6: Sew Forward at a Steady Speed
Let the feed dogs move the fabric. Hands guide the fabric; hands don’t pull it. Pulling creates stretching, crooked stitching, and puckering. A steady speed works better than an ambitious speed.
Step 7: Backstitch at the End
When the seam reaches the end, sew backward 3 to 4 stitches again. Raise the needle, lift the presser foot, and remove the fabric.
Step 8: Trim the Threads
Clip thread tails neatly. Loose thread ends make even a decent seam look unfinished.
After sewing, press the seam flat first to set the stitches, then press the seam open or to one side depending on the project. That extra minute changes the look a lot.
Common Types of Seams Used in American Sewing Projects
The most useful seam types for home sewing are the plain seam, French seam, flat-felled seam, zigzag-finished seam, and bound seam. Each one solves a different problem.
| Seam Type | Best Use | Strength | Finish Quality | What You’ll Notice in Practice |
|---|---|---|---|---|
| Plain seam | Everyday garments, simple décor | Medium | Basic | Fast and versatile, but raw edges often need finishing |
| French seam | Sheer fabrics, lightweight blouses, delicate linens | Medium | High | Clean inside and out, though it takes extra passes |
| Flat-felled seam | Jeans, workwear, heavy-use items | High | High | Very durable, but bulk can build up on thick fabric |
| Zigzag-finished seam | Home décor, cotton apparel, beginner projects | Medium | Medium | Easy on a standard machine and common in home sewing rooms |
| Bound seam | Unlined jackets, special finishes, couture-style interiors | Medium | Very high | Looks polished, though it takes more time and materials |
Plain seams are the standard starting point. Vogue Patterns, New Look, Butterick, and Simplicity all build around them because they’re flexible and easy to adapt.
French seams enclose the raw edge inside the seam itself. They’re especially useful on sheer or lightweight fabrics where fraying shows easily. Flat-felled seams, famously used by Levi Strauss & Co. on jeans, fold and stitch the seam allowance down for extra strength. That’s why denim side seams and inseams hold up to repeated wear.
A few comparisons stand out quickly:
- French seams look cleaner inside than zigzag finishes, but they aren’t ideal for thick fabrics.
- Flat-felled seams outlast plain seams in hard-wearing garments, though they add bulk.
- Zigzag finishes save money because they don’t require a serger or extra binding.
Seam Finishing Techniques to Prevent Fraying
Seam finishes protect raw edges from fraying and extend the life of the project. Without a finish, many woven fabrics unravel with wear and washing. Some fabrics fray dramatically after one laundering cycle, especially loosely woven cottons and linens.
The most common finishing options are:
- Zigzag stitch: A standard home-machine solution that wraps the raw edge loosely.
- Pinking shears: Serrated blades that reduce fraying by cutting a zigzag edge.
- Serger or overlock stitch: Trims and encloses the edge in one step.
- Bias binding finish: Covers the raw edge with a fabric strip for a neat interior finish.
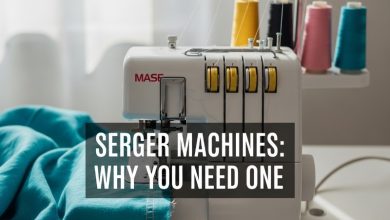
A serger from Baby Lock, Juki, or Singer creates the cleanest mass-market style finish, and entry-level models often fall in the $250 to $500 range in the U.S. That said, a regular machine with a zigzag stitch still handles most beginner and intermediate needs well.
The difference usually comes down to trade-offs:
- Pinking shears are fast, but they don’t control fraying on every fabric.
- Zigzag finishing is accessible, though it can look less polished than overlocking.
- Bias binding looks beautiful, but it adds time and bulk.
For everyday home sewing, zigzag finishing covers a surprising amount of ground. For garments that get washed constantly, a serged finish tends to hold up better over time.
Pressing and Seam Care for Professional Results
Press every seam after stitching because pressing shapes the seam, reduces bulk, and makes the project look more professional. This is the step that separates “handmade in the best way” from “homemade and slightly lumpy.”
Pressing doesn’t mean sliding the iron around like regular ironing. In sewing, pressing means lifting and lowering the iron with intention. Steam helps set stitches. A pressing cloth protects delicate fabrics. A seam roll or tailor’s ham supports curved and narrow areas without flattening them awkwardly.
Some seams are pressed open. Others are pressed to one side. Quilts often use one-direction seam allowances for nesting. Garments vary depending on fabric bulk and pattern design. There isn’t one universal answer, which is exactly why the pressing step needs attention rather than habit.
Useful pressing tools include:
- Steam iron from brands such as Rowenta or Black+Decker
- Pressing cloth for delicate or heat-sensitive fabrics
- Seam roll for narrow seams and sleeves
- Tailor’s ham for curves like darts and princess seams
Press the seam flat first to set the stitching. Then press it open or to one side. That sequence works better than jumping straight to the final position.
Common Seam Mistakes and How to Fix Them
The most common seam problems are uneven seam allowance, puckering, skipped stitches, and tension imbalance. None of them are rare. Most of them show up on ordinary projects, not just difficult ones.
Uneven Seam Allowance
This usually happens when attention stays on the needle instead of the seam guide. The fix is simple but not glamorous: guide the edge along the plate markings and sew more slowly for a while.
Puckering
Fabric puckering often comes from tension problems, pulling fabric while sewing, or using the wrong needle for the material. Lightweight cotton sewn with a dull or oversized needle tends to complain quickly.
Skipped Stitches
Skipped stitches usually point to needle issues. A bent needle, wrong needle type, or incorrect insertion can interrupt stitch formation.
Thread Tension Problems
Loops on the underside often suggest upper-thread issues. Tight, strained seams can point to tension set too high. Small tension changes work better than dramatic ones.
A seam ripper is the cleanup tool that ends up earning its place in every sewing kit. Use it carefully, remove stitches a few at a time, and test the correction on scrap fabric before resewing the full seam.
Common fixes that tend to help:
- Change the needle first. It solves more stitching problems than many people expect.
- Rethread the machine completely. A threading mistake can mimic a bigger machine issue.
- Test on scraps from the same fabric. Different fabrics react differently even with the same settings.
FAQs: How to Sew a Seam
What is the standard seam allowance in the U.S.?
Most commercial sewing patterns in the U.S. use a 5/8-inch seam allowance.
Can a seam be sewn by hand?
Yes. A hand-sewn backstitch creates a strong seam when a machine isn’t available.
How do seams stop fraying?
Use a seam finish such as zigzag stitching, pinking shears, bias binding, or a serger finish.
Why do seams pucker?
Puckering usually comes from tension imbalance, pulling the fabric, or using the wrong needle and stitch setup for the fabric.
Does every seam need pressing?
Yes, in practice nearly every seam benefits from pressing. The seam lies flatter, looks cleaner, and behaves more predictably in the finished project.
Conclusion
A good seam doesn’t look dramatic. That’s part of the point. It sits flat, holds firmly, and lets the project make sense as a whole. Whether the project is a pair of curtains, a quilt block, a Thanksgiving table runner, or the side seam of a denim skirt, the same basics keep showing up: accurate seam allowance, stable stitching, clean finishing, and proper pressing.
That rhythm becomes familiar after a while. Align the fabric. Watch the seam guide. Backstitch at both ends. Press the seam before moving on. The process stays simple, but the results get sharper, cleaner, and much more dependable.
Sources
[1] American Sewing Guild, sewing fundamentals and garment construction resources.[2] Coats & Clark, thread and sewing technique guides.