There’s a particular kind of frustration that comes from sitting down to sew and watching your machine produce skipped stitches, tangled thread, or uneven tension — especially when you haven’t changed a thing about your technique. Nine times out of ten, the culprit isn’t you. It’s a buildup of lint, dust, or old oil quietly wreaking havoc inside the machine.
Keeping a sewing machine clean isn’t complicated. But it does require knowing what to clean, how often, and — just as importantly — what to avoid. This guide walks through the whole process, step by step, so your machine runs as smoothly as the day you brought it home.
Contents
- 1 Why You Must Clean Your Sewing Machine Regularly
- 2 Tools You Need to Clean a Sewing Machine
- 3 Unplug and Prepare the Machine
- 4 How to Clean the Bobbin Area
- 5 Clean the Feed Dogs and Needle Plate
- 6 How to Oil a Sewing Machine After Cleaning
- 7 Clean the Exterior and Thread Path
- 8 How Often Should You Clean Your Sewing Machine?
- 9 Common Mistakes When Cleaning a Sewing Machine
- 10 Final Thoughts
Why You Must Clean Your Sewing Machine Regularly
Most sewing problems that seem mysterious have a very mundane cause: neglected maintenance. Lint from fabric accumulates in the bobbin area faster than most people realize, and once it builds up around the feed dogs or inside the bobbin case, it starts affecting thread tension almost immediately.
Dust clogs the feed dogs — those little ridged teeth that grip and move your fabric forward — and when they’re packed with debris, the fabric doesn’t advance evenly. That’s where uneven stitches and puckering come from.
Old oil is another slow killer. Sewing machine oil is lightweight by design, but over time it thickens, turns sticky, and creates friction instead of reducing it. That friction causes mechanical wear on the drive shaft, internal gears, and hook assembly. Eventually, it leads to that grinding sound no one wants to hear.
Skipped stitches, thread jams, stitch inconsistency — they’re usually symptoms of a machine that just needs cleaning. Not a repair technician. Not a new needle. A brush and five minutes of attention.
Tools You Need to Clean a Sewing Machine
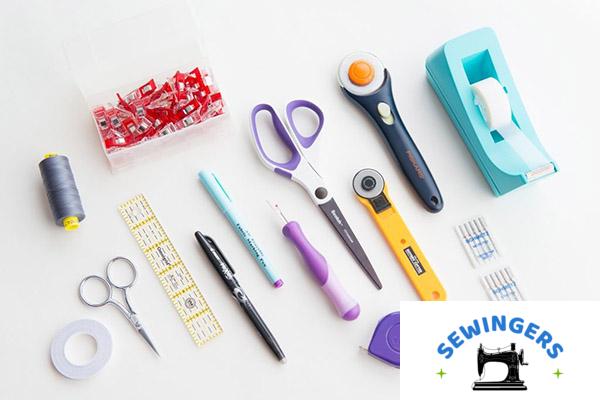
Getting the right tools together before starting makes the whole process faster and less frustrating. Here’s what’s worth having on hand:
- Small cleaning brush — Most machines come with one. Fine bristles work best for dislodging lint from tight spaces.
- Microfiber cloth — Non-abrasive, won’t scratch the casing or thread guides.
- Screwdriver — Usually a Phillips head, for removing the needle plate.
- Sewing machine oil — Not WD-40, not olive oil, not anything from the kitchen cabinet. Actual sewing machine oil, which is thin, clear, and designed for precision mechanisms.
- Tweezers — Handy for pulling out thread pieces stuck in awkward spots.
- Compressed air — Use this one carefully. More on that in a moment.
One thing worth noting: compressed air in a can can push debris deeper into the machine rather than out of it. It’s useful for exterior vents but should be used sparingly and at an angle inside the machine. Many experienced sewists skip it entirely and rely on the brush alone.
Unplug and Prepare the Machine
This step sounds obvious, but it’s the one most often skipped. Always turn the machine off and unplug it before doing anything else. The foot pedal can accidentally engage the motor, and nobody wants a needle moving while their fingers are near it.
Once it’s unplugged:
- Remove the needle from the needle clamp.
- Take off the presser foot.
- Remove the bobbin and bobbin case.
Setting everything aside in a small tray helps avoid losing tiny screws or parts. Static buildup can be an issue with certain machine casings, so wiping the exterior with a slightly damp (not wet) microfiber cloth before opening things up is a good habit.
How to Clean the Bobbin Area
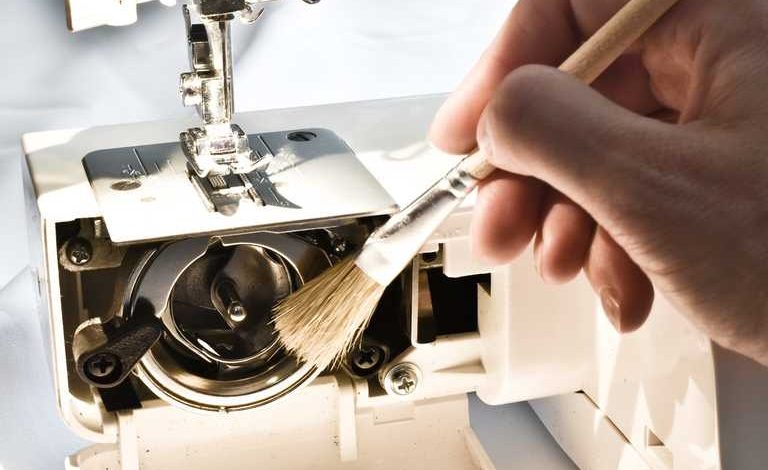
The bobbin area is where the most lint accumulates — it’s basically a lint trap in disguise. This is also where most tension problems originate, so it’s worth cleaning thoroughly.
Remove the bobbin case and set it aside. Using the small brush, sweep out the lint from the rotary hook and shuttle hook area. Work in short, deliberate strokes rather than blowing. Blowing — even just with your breath — introduces moisture, which can cause rust on metal components over time.
Check for broken thread pieces caught in the tension spring or around the metal housing. Tweezers are useful here. These small thread fragments are easy to miss and surprisingly effective at disrupting tension.
Once the area looks clear, give the bobbin case itself a quick wipe with the dry microfiber cloth. Check that the tension spring on the case isn’t bent or damaged while it’s out — that’s a common cause of thread jamming that gets overlooked.
Clean the Feed Dogs and Needle Plate
The needle plate (also called the throat plate or stitch plate) needs to come off to clean the feed dogs properly. Use the screwdriver to remove the screw mount — usually one or two small screws — and set the plate aside.
With the plate removed, you’ll have clear access to the feed dog teeth. Brush between the grooves to remove fabric dust and thread fibers. There’s often a surprising amount of debris packed in there, especially after working with fleece, velvet, or other high-lint fabrics.
Wipe the underside of the needle plate with the microfiber cloth before screwing it back in. Don’t overtighten the screws — snug is enough. Over-tightening can strip the threads in the screw mount, which turns a five-minute cleaning task into a repair job.
How to Oil a Sewing Machine After Cleaning
Oiling is where a lot of people either over-do it or skip it entirely. Both cause problems.
The general rule: one drop of sewing machine oil at each key joint. Focus on the drive shaft, hook assembly, and any moving metal-on-metal contact points your machine’s manual identifies. If the manual isn’t handy, most machines have a diagram inside the bobbin cover or in the original packaging.
Do not use:
- WD-40 (it’s a solvent and degreaser, not a lubricant for fine mechanisms)
- Household lubricants like 3-in-1 oil (too heavy, attracts lint aggressively)
- Cooking oils of any kind
After oiling, run the machine for a minute or two on a scrap piece of fabric — without thread at first, then with thread — before starting on a real project. This distributes the oil through the moving parts and lets any excess absorb into the scrap rather than your actual fabric.
Quick Reference: Oiling Do’s and Don’ts
| Action | Recommended | Avoid |
|---|---|---|
| Oil type | Sewing machine oil (clear, lightweight) | WD-40, cooking oils, household lubricants |
| Amount | One drop per joint | Multiple drops, pooling |
| When to oil | After cleaning, every 8-10 hours of use | Oiling without cleaning first |
| After oiling | Run on scrap fabric | Sewing directly on project fabric |
The table above might seem like common sense, but the WD-40 mistake is genuinely common — it’s in almost every garage and seems like a logical choice. In practice, it strips the existing lubrication and leaves residue that gums up the internal gears over time.
Clean the Exterior and Thread Path
The outside of the machine matters more than it gets credit for. Dust accumulates in the vent slots and can work its way into the motor if left long enough.
Wipe down the machine casing with the dry microfiber cloth. Pay attention to:
- Thread guides — Lint catches here and affects how thread feeds through to the needle.
- Tension discs — Use the corner of the cloth to gently wipe around and between the discs. Built-up residue here directly affects stitch consistency.
- Spool pin — Thread fibers wrap around this more than people notice.
- Handwheel — Dust settles in the grooves and can work its way in if left.
- Vent slots — A dry brush works better than cloth here. Don’t use compressed air pointed directly at vents.
The thread path from spool to needle is essentially a system of guides and surfaces. If any part of it has residue or lint buildup, the thread tension won’t be consistent — even if everything else is clean.
How Often Should You Clean Your Sewing Machine?
This depends heavily on how much you sew and what fabrics you work with. A rough, practical schedule that works for most people:
- After every big project — Especially anything involving fleece, flannel, velvet, or terry cloth.
- When switching between very different fabric types — Going from denim to silk, for example.
- Every 8-10 hours of active sewing time — This is roughly the interval most machine manufacturers suggest.
- Professional servicing once a year — A technician can check internal components, calibrate tension, and catch mechanical wear before it becomes a real problem.
Heavy-duty sewing or quilting machines that run daily need more frequent attention than a machine used occasionally for small repairs. Industrial machines and long-arm quilting machines have their own maintenance schedules, often more intensive.
The honest answer is: clean it more often than you think you need to. Most sewing machine problems could have been prevented with slightly more frequent maintenance.
Common Mistakes When Cleaning a Sewing Machine
A few things that are genuinely worth avoiding:
Using household oil. The most common mistake. WD-40 in particular gets used constantly because it’s familiar and it’s in most toolboxes. It doesn’t belong near a sewing machine’s internal mechanisms. The same goes for 3-in-1 oil and cooking oils — they’re either too heavy or too sticky to work well in precision machinery.
Blowing moist air into the machine. Even exhaling into the bobbin area introduces enough moisture over time to encourage rust on metal components. Use the brush. Skip the breath.
Skipping the unplugging step. The motor can engage unexpectedly if the foot pedal is bumped. This is an electrical risk, but it’s also a sharp-needle risk.
Over-tightening screws. When reassembling the needle plate, snug is enough. Tightening past that strips threads and can crack the plastic around screw mounts.
Cleaning without oiling, or oiling without cleaning. These two steps work together. Oiling a dirty machine just moves lint around and mixes it with fresh oil. Cleaning without oiling afterward leaves metal joints running dry.
Final Thoughts
A well-maintained sewing machine is quieter, more consistent, and genuinely more enjoyable to use. The difference between a freshly cleaned machine and one that’s been running for months without attention is noticeable the moment you start sewing — the stitches are even, the tension is consistent, and the whole thing just sounds better.
The whole process — bobbin area, feed dogs, needle plate, oiling, exterior — takes about 15 to 20 minutes once you’ve done it a few times. That’s a small investment against the cost of a repair bill or the frustration of a project ruined by tension problems.
Clean it regularly, oil it correctly, and it’ll run well for years