
The machine that outranks the rest in the list is Brother XM2701. This full-featured and lightweight designed machine is a versatile device. It can handle multiple sewing projects everyday. The machine covers a broad range of users through its versatility.
Sewing is a creative, innovative and fun activity for your kids to explore their potential. It is a great idea if your kid is showing any interest or you are introducing sewing in his or her life.
Your kids will always have a constructive medium to show their creativity rather than wasting time on smartphones. You can get them sewing machines which are kids friendly, high performing and safe.
There is no age limit to start learning sewing. Supervise your child and they can master the skill with time.
Younger kids get distracted and lose interests too soon. So to keep them engaged you may make it a fun activity and teach them effectively. Have a look on my top 5 picks.
Contents
- 1 Benefits of Sewing for your kids
- 2 Factors to Consider while choosing Sewing Machine
- 3 5 Top Rated Sewing Machine for Kids With Reviews
- 4 Verdict
Benefits of Sewing for your kids
Learns patience, hard work, dedication, and concentration
- It takes time to learn sewing and eventually it brings patience in your kid. You need to be patient and focused while converting a simple fabric into something special.
- Sewing instills hard work and dedication in your kid. These attributes are very basic and important in child development. Through sewing kids inherits these qualities at a very tender age.
- Such creative hobbies do a lot of character building work for you. These attributes not only help the kid in sewing but also in maintaining their social life and relationships.

Improves motor and instant skills
- Sewing is an activity which needs alertness, dexterity, and coordination among brain, fingers, and foot.
- Kids learn the courage to accept challenges in positive ways. To give sewing a head start you may teach your kid practicing in and out motion and lacing yarn first.
- Sewing improves the instant reactions plus gives a regular exercise to the brain. Once leaned kids tend to engross in this activity without noticing the time.
Lifelong skill to learn
- Sewing will be your lifelong investment in your kid’s life. There are hobbies which you can do at any point in life, sewing is one of them. There is no particular age to start and stop.
- Even if your child’s eyesight is weak you have all the features to overcome it. The backlit LCD gives visibility and clear instructions for the perfect stitching.
- Sewing is a timeless activity which improves with age. It will always be beneficial not only for your kids but also for every member of your family.
Factors to Consider while choosing Sewing Machine
To maintain your kid’s interest in the sewing, the choice of machine is important. A sewing instrument that is difficult to handle, unreliable can keep your child away from the hobby. Even this may make the easy and exciting projects short-lived, boring and difficult. Here are some good pointers which you may consider:
Mechanical or computerized Sewing machine
No parent wants to make complex choices for their kid. You may avoid ultra hi-tech functionality or complicated stitching options. Choose either a mechanical or a basic computerized machine.
In the mechanical machine, the child have to manually control the levers, switches, and gears. Whereas in computerized, the machine will control everything for him or her.
Mechanical machines are sturdy, reliable without any circuit board. But in computerized you get more fancy features through circuit boards which may get damaged with time.
I would suggest staying away from advanced and fancy options is wise. It can be tricky to use.
Even you will spend extra on the computerized complex machine. But there are some companies which sell computerized machines which are worth buying. They have features which make the learning very easy and fun.
Like if you are considering a computerized machine then LCD screens are quite helpful. They tell you the presser foot for each stitch. I have listed the computerized sewing machines too.
Stitches
It is an important factor which cannot be avoided. Some machines have extra stitching options which is not needed at an early stage. But if your child is already an expert then you may consider that option too.
Try to get the machine with all the standard stitch option. The additional stitches may give enough room for some creativity and experimentation.
Bobbin Winding
The sewing machine must have a bobbin slot which will be easy to open to insert the thread. The bobbin should be easy to set up in the slot and wind up to avoid frustration and irritation.
Feet
Some sewing machines have feet pedal so delicate that every time you give even the slightest touch it will fall off. It is so sensitive that your kid may sew her fingers together.
Choose a sewing machine that has a snap on feet and stays in place. If you are afraid of feet falling off then search for a model which has feet attached with the screws.
Threading Feeder
Threading through the needle eye is quite an irritating step for your little ones while they in the learning stage. You may select the model with step by step diagrams on which your kid can practice.
Speed Controller
Your child will have fun if he or she can handle the features and speed comfortably. Look for a something which can work on consistent and even speed.
Consider a model with push buttons as it will allow your kid to control the speed more. Whereas feet pedal may not be comfortable and tiresome for your tiny tot.
User-friendly
You may prefer the machines which have top loading drop-in bobbin system. Top loading is easy to load and wind. It has less probability of jamming.
The start and stop button and speed slider is a useful feature to consider. Kids find it difficult to coordinate foot pedaling. So controlling the speed with pedal give your child the time to master the pedaling skill.
The foot pedal is indeed a feature which can be a little costly but it can definitely maintain the focus of your kids.
Authenticity
When you invest in something, you always check the reliability and durability. Search for the machine which can last for many years.
In this, you may consider the company’s reputation, the material used for making it and the after sale service. So keep an arms distance from the companies whose products need regular servicing and maintenance.
Safety Factors
As a parent, you have to supervise your kid every moment especially when the kid is a beginner. There are machines in the market which have features that can prevent the mishaps.
The fingers are the risky parts to any accidents. You can use finger guards to save the tiny fingers. Some companies add them in accessories and sometimes you can buy them separately.
You can also set up a sewing station so that your tiny tot can easily reach the foot pedal. These minor gears safes your kid from many accident.
5 Top Rated Sewing Machine for Kids With Reviews
1. Brother Sewing and Quilting Machine, CS6000i
The Brother’s portable sewing and quilting machine CS6000i is an economical and highly versatile option. Don’t worry if your kid is a first time user, this machine’s setup is easy to use and user-friendly. If the kid is a pro, you should check this machine once before finalizing some other brand.
CS6000i gives a lot of features for sewing and quilting with 60 inbuilt sewing stitches. Also, it comprises several options for beautiful stitches plus a single- step buttonhole in 7 different styles.
The 9 presser feet are overcasting, zipper, blind stitch, buttonhole, monogramming, zigzag, walking, spring action quilting foot and button fitting. It works well with thick fabrics.
It has a backlit LCD display, a speed controller for adjustable sewing, automatic needle threader and much more. The kid can easily follow the threading figures on the brightly lit part. It is easy to see when tiny tot is experimenting with dark shaded fabrics and threads.
If the child finds it difficult to put thread across the needle hole regardless of the reason, automatic needle threader does it for him or her. It perfectly aligns the needle and the thread. The inbuilt free arm helps you to sew sleeves, trouser legs ad cylindrical material.
The Brother sewing machine comes with a hardcover which makes it easy to carry. Also, it includes a bilingual user manual and a DVD for the kids who are new to sewing. It does not support 120V AV, check the supply before opting for this machine. The best support is 25 year of limited warranty, online technical for forever and free customer service.
In short, it will be your kids forever companion. The key features are easy to use for any age group.
Pros
- Easy to use
- Ideal for kids of any age group
- the detachable wide table is makes the kid comfortable to work
- Users are happy with noise-free mechanism
- Value for money with these many features
- LCD, screen, time-saving needle options, speed controller
- Adds protection with hardcover
- Lifetime assistance
Cons
- It is made of plastic so children feels vibrations when working on heavy fabrics
- Less storage for accessories
- Requires maintenance or it will rust
2. Singer Start 1304 Sewing Machine

Since 1851, Singer is a world’s leading seller of artisan and consumer sewing machines. It is the world’s most recognizable and trusted brand with a long history of continuous innovations. The breakthroughs were to introduce the world’s portable, computer controlled and zigzag sewing machine.
Singer uses heavy-duty metal for internal frame ensuring the stability and stainless steel bedplate that gives even sewing on smooth fabric. The frame maintains perfect alignment and durability for skip-free sewing. This machine will last for years even after rough usage.
To start working on 1304 machine becomes quite easy with preset adjustments. Kids don’t have to make any stitch length and width. You set the requirements for your kids and it will do as per that. Also, for hobbyists and beginners sewers the features are friendly to get a creative ground.
Even your child can set up in no time through the threading diagrams printed right on the machine. When commanded it can automatically make elegant buttonhole designs in simple 4 steps. It includes 6 inbuilt stitches which are satin, straight, blind hem, zigzag, 4- step buttonhole and scallop.
For a kid’s creative side, it offers easy all-purpose foot, buttonhole foot, and zipper foot. Buttonhole foot to add buttonholes, ribbon slots and much more. All-purpose foot to complete the kind of sewing projects. Zipper foot to add piping, zip cording, etc.
For fast sewing, it has dual vertical spoon pins for twin needle operation (optional in purchase). It is helpful for flawless hemming or to give a charming touch. In just one step, tiny tots can access the stitch dial and set according to the need.
Pros
- Portable and lightweight
- Children friendly with all basic functions
- Preset adjustment options for length and breadth
- No unnecessary feature
- For both first time users and experts, free arm function is useful
- 25 years of the limited warranty
- LED backlit, 3 presser feet
Cons
- No foot pedal speed controller
- An automatic built-in needle threader is missing
3. Janome Fast Lane Fuchsia Compact Portable Sewing Machine
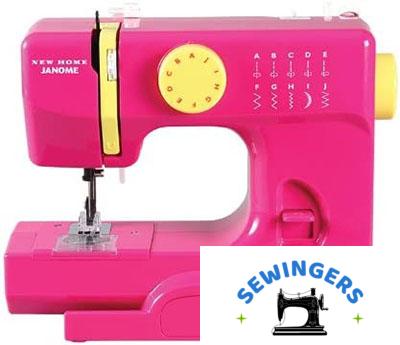
If your kid is a young enthusiast or an experienced sewist, have a look on the starter package of Janome Fastlane graceful portable sewing machine. The compact Fastlane Fuchsia is a popular choice which comprises all the important features to tackle a variety of projects.
There are many Janome sewing machines in the market, but during a short period, Fastlane has brought a sense of energy into many homes. From a simple tailoring, alterations and mending task to paper crafting and scrapbooking, this 5-pound portable machine can do every work with ease.
If your kid is a newbie in sewing, he may take this little kitty to your sewing classes too. It offers many color options; you can let your kid pick and choose. Fuchsia has pink lightening or purple thunder as options. But Fastlane includes orange blaze, turbo teal, and buzzin blue.
Fastlane Fuchsia has around 10 inbuilt stitching patterns. The key features include the variations in 4 stitches with 6 stitch length and width. First 5 straight stitches are basic sewing and inserting the zipper. Next 3 zigzag stitching has garment designing and basic mending or tailoring. The one cresent or scallop stitching is for appliqué and embellishment. The last variation is zigzag multi stitching for stretched fabrics like knits.
For the safety of the young ones, a finger guard is given with the presser foot. It protects the sensitive little fingers. Also, accessory storage, free arm, easy reverse, and the lightweight machine keeps the kids hassle free. For easy setup, top drop-in clear cover and threading diagrams are given.
Pros
- Recommended for beginners too
- Available in several fun colors
- Reverse sewing is possible
- Top loading drop-in loading is there to save your time
- Capable of free arm sewing
- Compact, Portable, affordable and lightweight
Cons
- There is no built-in light. But you can attach a light with the machine which will be battery operated.
- No automatic threader
- Works on only one speed I.e. no speed dial
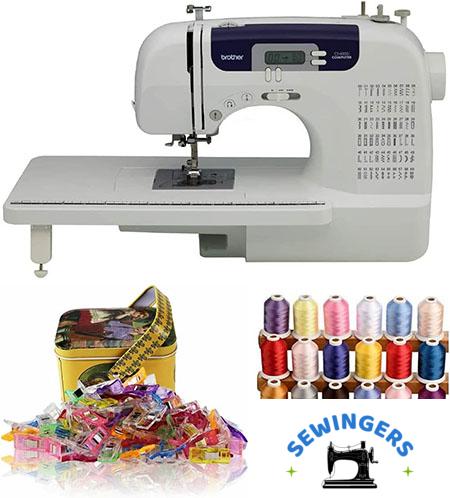
4. Brother XM2701 Sewing Machine

Brother International Corporation has attained this position over the years. The company is still maintaining its reputation with the perfect and versatile sewing machines. It is one of the leading sellers of high-end innovative products from embroidery enthusiasts to home sewing.
Brother XM2701 is another product on my list from Brother’s brand. It is a fun option among kids. The young sewers like this for the various sewing options, lightweight and an inbuilt needle threader. In short, this inexpensive machine is a dream for the kids.
The 7.2 pounds machine has a single step auto-size button hole, 6 quick changing sewing feet with an instructional DVD. It gives the option of inbuilt needle threader with a top drop-in bobbin with a complete automatic bobbin winding setup. You can use a bright LED for more visibility.
The 6 fast change sewing feet comprises zipper foot, narrow hem foot, zigzag foot, buttonhole foot, button sewing foot, and blind stitch foot. It is a multifunctional free arm sewing machine which is perfect for everyday sewing projects. The users from beginners to pro are highly satisfied.
Also, if the kid has an innovative brain you will not be disappointed. The 27 unique in-built stitches with the maximum sewing speed of 800 stitches per minute are included. He or she can do the blind hem, zigzag stitching and decorative stretch stitching to enhance the look of the fabric.
Brother XM2701 is jam resistant and features a top drop-in the bobbin to save your time and energy. The company gives 25-year limited warranty with a bilingual user manual and free technical support until the life of the product. You can enjoy the service till eternity.
Pros
- Good for kids and teenagers
- Ideal for customized projects for school
- Auto-sized buttonholes with LED lit working area
- 27 inbuilt stitches to cover wide projects
- Automatic needle threader and the easy stitch selector
- Online technical support for the life of the product
- Quick set-top drop-in bobbin keeps the bobbin in place.
Cons
- Users said that the foot pedal is a little sensitive
- Avoid it your country doesn’t 120 VAC
- No machine cover
5. Singer 4423 Heavy Duty Sewing Machine

Singer 4423 is considered as a dependable, true functioning workhouse with a powerful motor and heavy-duty metal frame. It can smoothly work on denim to the canvas at very high sewing speed with its powerful motor. Your little one can create his own collection of customized and personalized fashion by sitting at home.
Singer 4423 works best for quality and high-speed stitching. It can sew 11000 stitches in a minute. The mid-range model has a super fast speed feature whereas other models of this range can sew 500 to 600 stitches per minute.
The 4423 has 23 stitches which is a good number for pro kids and beginners. Out of 23 stitches, 12 are decorative, 6 are basic, 4 are stretch and 1 is for buttonhole.
If your kid wants more stretch stitching (3 more) and decorative (6 more) then you may consider Singer 4432 Model. But if child is more into home decorations, embroidery crafts or only to sew clothes then Singer 4423 is perfect for you.
This machine is capable of handling any type of fabric.Kids experimented on upholstery vinyl, denim, leather, corduroy, canvas, and many other materials. It also responds well while working with patches on vests and leather fabrics.
Not only thick fabrics, but it also produces quality products on delicate and thin materials too. The right thickness of needle matters for fabrics like silk satin, stretchy lycra, viscose, and rayon. Make sure you choose the correct thickness of needle for your kid as per the fabric.
Next important thing is the length and width of the stitches. Generally, for thick fabrics, you do long stitches and for thin and light fabrics, short stitches are required. For that a dial is there, the child can choose the relevant dimensions out of 6 options. Rest it will manage for him.
The little eyes don’t need to stress as there is automatic needle threader. Plus top drop-in bobbin to know when the thread is going to finish. To maintain the speed, kid can use the foot control pedal. Also, kids strengthen the stitches with automatic reverse sewing.
The singer has an assistant app which guides your cute little one through all the techniques and fabrics. For beginners, you can see tutorials on youtube. There is a manual with step wise step guide. All this will help the child to set up the machine without any hassle.
Pros
- Quality stitching on a variety of fabrics
- User-friendly for both beginners, regular sewers and experts
- Time-saving because of 1100 stitching speed per minute
- The internal body comprises heavy duty metal
- Comes with 3 needle positions
- Automatic needle threader, free arm presser, adjustable stitching length and width
Cons
- Computerized functions are missing
- A user said that It makes a loud noise while working
- Little difficult to regulate foot pedal speed
Verdict
The best sewing machine for kids in my view is Brother XM2701. It is lightweight, fully featured with a 25 year of limited warranty machine. It has simple to set up and use features.
With these reviews, I conclude my best sewing machines for kids. I have done deep research and comparison to shortlist the best five choices for your kids.
I consider rather than going for fancy stuff with thousands of features; you should go for something worth your money.
I hope my selection of best sewing machines for kids will help you to make a better choice. Good Luck and happy sewing!


