
After the awesome reaction to my preceding article reviewing the pinnacle stitching machines at the market, I`ve determined to tackle a brand new topic – stitching system tables. If you have a stitching system however lack a right desk to apply it on, that is the thing for you.
I’ll be doing a deep dive into the sector of stitching system tables – their features, functions, and what makes a awesome one. My aim is that will help you discover the proper desk to degree up your stitching sport with out breaking the bank.
For this review, I very well researched and examined seven special stitching system tables throughout numerous charge points. I’ll smash down the professionals and cons of every one, so that you can discover the desk that fine fits your wishes and budget.
Get geared up to discover the cream of the crop while it comes to stitching system tables. Let’s get into it!
Contents
- 1 7 Best Sewing machine table list
- 1.1 South Shore Crea Sewing Craft Table on Wheels
- 1.2 South Shore Artwork Craft Table with Storage
- 1.3 Sullivans Quilter’s Table
- 1.4 Studio Designs Eclipse Sewing and Craft Table, Black/White
- 1.5 Sauder Sewing Craft Cart, Cinnamon Cherry Finish
- 1.6 Soft White Sauder Sewing and Craft Table
- 1.7 Sewing / Craft Center – Folding Table
- 2 Finding the Perfect Sewing Machine Table: What to Consider
- 3 Can I use a everyday desk as a stitching device desk?
- 4 Conclusion
7 Best Sewing machine table list
Are you looking for the right stitching gadget desk to take your crafting to new heights? Look no further! In this guide, we`ll discover the pinnacle 7 stitching gadget tables assured to decorate your workspace and streamline your innovative method.
- South Shore Crea Sewing Craft Table on Wheels
- South Shore Artwork Craft Table with Storage
- Sullivans Quilter’s Table
- Studio Designs Eclipse Sewing and Craft Table in Black/White
- Sauder Sewing Craft Cart in Cinnamon Cherry Finish
- Sauder Soft White Sewing and Craft Table
- Folding Sewing/Craft Center Table
We’ll dive deep into the specific capabilities and designs of every desk. For your convenience, we have got covered direct buying hyperlinks so that you can without problems test costs and make purchases with out immoderate browsing.
Excited? We’ve streamlined the method so that you can cognizance on what you love – crafting! Get geared up for an in-intensity evaluate of those outstanding stitching workstations. By the end, you will have all of the insights had to pick the right centerpiece to your craft room.
Let’s embark in this innovative adventure together!
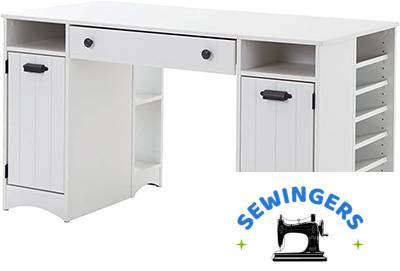
South Shore Crea Sewing Craft Table on Wheels

The very first sewing machine table that comes in our list is South Shore Crea Sewing Craft Table on Wheels. You will love this sewing table. This sewing table comes with a great look, attractive design, and handy features. Here are the features of this sewing table:
- South Shore Crea Sewing Craft Table is scratchproof and water-resistant.
- It is more flexible and can be used as a craft table as well as a sewing table. This means you can perform two different tasks with the help of this best sewing machine table. No need to buy a craft table and sewing machine table differently.
- It has two open storage spaces.
- It comes with a 5-year limited warranty.
- I hope these features are enough to make you but this amazing sewing machine table. If not, no worries, still 6 sewing machine tables are on the way in this post.
South Shore Artwork Craft Table with Storage
I have listed this sewing table at number two on our list. This sewing table is much similar to the sewing I reviewed above. But it has some additional features as well which are listed below:
- It comes with an additional 3 spaces with 2 adjustable shelves.
- It comes with larger work surface
- Both listed above and this sewing table are made in Canada.
Sullivans Quilter’s Table

I am listing this best sewing machine table at the number 3 in our listing. This table has some unique features which make it different from other sewing tables. Here are some features of Sullivans Quilter’s Table for your sewing needs.
The main feature of this sewing table is that it supports fold out melamine table with 1 inch gridded surface.
- It has high-quality locking casters.
- Dimensions: 47L x 35.5W x 29.75H Inch (Open), 47L x 16.5W x 29.75H inch (Closed).
- It has a roll-out serger storage shelf.
Studio Designs Eclipse Sewing and Craft Table, Black/White

This sewing table is also very popular among the sew lovers. I have listed Studio Designs Eclipse SewingTable at the fourth number. Let’s have a look at their features:
- This sewing table comes with drop-down platform dimensions: 22.75 inches wide x 10.75 inches deep.
- It has a folding side shelf with 9.25 inches wide and 23.5 inches deep.
- It comes with heavy gauge steel construction
- Table Comes with Dimensions: 44.75 inches wide x 23.5 inches deep x 29 inches high
- It has an adjustable platform.
Sauder Sewing Craft Cart, Cinnamon Cherry Finish
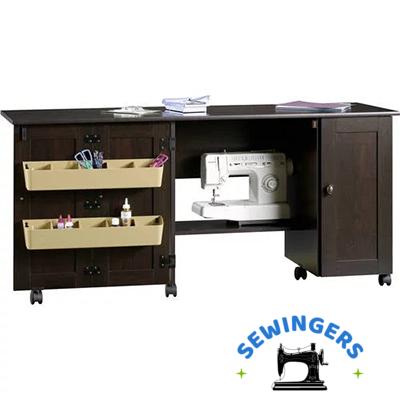
After reviewing four best sewing machine tables now it’s a turn of reviewing the fifth one. I have listed the Sauder Sewing Craft Cart table in the fifth position. Now without wasting time I would like to discuss some of the amazing features of these Sewing tables. So let’s start.
- This sewing machine table has drop-leaf for extra work surface
- It has a roll-open door with two storage bins
- This sewing machine table also comes with adjustable shelving behind the right door.
Soft White Sauder Sewing and Craft Table
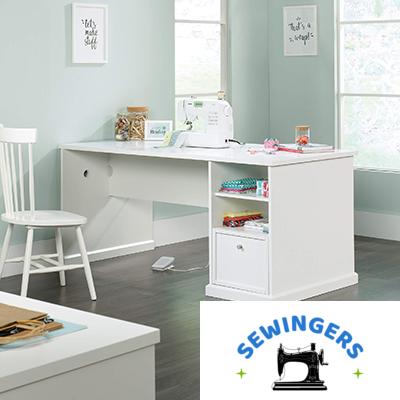
Now it’s the turn to review Soft White Sauder Sewing and Craft Table to our list. This table has also almost the same features of the sewing table reviewed above (at number 5). So, here are the main features of this sewing machine table:
- It also comes with 2 storage bins attached to the door.
- This sewing machine table comes in white color as it is already being cleared with the name of this best sewing machine table.
- Dimensions of this Sewing table: 40″W x 19″D x 28.5″H
- It comes with drop leaf and 2 adjustable shelves.
Sewing / Craft Center – Folding Table

After reviewing the list of 8 best sewing tables now it’s the turn to review the seventh and last but not least sewing machine table from our list. So the name of the sewing table I am going to review in this post is Sewing / Craft Center – Folding Table. This Sewing machine table is suitable for all types of Sewers. As it has already been cleared by the name that this sewing machine table comes with Folding support. It also comes with Drop leaf, 2 storage bins attached to the door, 2 adjustable shelves.
Finding the Perfect Sewing Machine Table: What to Consider
Selecting the appropriate stitching system desk is an crucial choice that calls for cautious thought. As you embark in this quest, there are numerous key elements to maintain in thoughts to make certain you pick out a desk that completely enhances your desires and workspace.
Size Matters
The desk`s dimensions have to align with the to be had area for your stitching room or craft region. Measure the region and in shape it to the desk’s size, permitting sufficient paintings floor round your system for ease of use.
Built to Last
Stability and sturdiness are paramount. Look for a sturdy, well-built desk that might not wobble or vibrate as you sew. This stability guarantees precision sewing and forestalls troubles down the line.
Storage Savvy
An prepared crafter is a satisfied crafter! Consider tables with available garage compartments, drawers or shelving to well stow away your notions, threads, and tools. Keeping necessities near to hand allows efficient, uninterrupted workflow.
Ergonomic Excellence
Your consolation have to be a pinnacle precedence whilst stitching for prolonged periods. Adjustable height, sufficient legroom, and an ergonomic layout that minimizes stress for your neck, lower back and palms will can help you craft in glad consolation for hours on end.
Style Savvy
While characteristic leads the way, aesthetics are crucial too. Choose a stitching desk that enriches your innovative area with its elegant appearance and blends seamlessly together along with your decor for an inspiring paintings environment.
Portable Potential
If you envision taking your stitching hobbies at the road, portability can be a key need. Folding or lighter-weight tables can simplify shipping with out sacrificing durability whilst set up.
Budget Balanced
Establish your finances on the outset, thinking about each quick and long-time period costs. With a few research, you may in all likelihood discover an most advantageous combo of features, high-satisfactory creation and excellent value.
Customer Kudos
Finally, take a look at client evaluations and scores to get precious real-global insights. Feedback from others can spotlight strengths and capability drawbacks to manual your very last choice.
With considerate assessment of those key elements, you may be well-prepared to pick out the ideal stitching system desk in your desires, budgets and private fashion preferences. Happy crafting!
Can I use a everyday desk as a stitching device desk?
Many sewers, specifically the ones simply beginning out or with restrained space, prefer to use a everyday desk as their stitching station. While it could now no longer have specialised functions designed mainly for stitching, an normal desk can simply get the process performed adequately.
There are some key concerns whilst repurposing a everyday desk for stitching. First, make certain the desk is huge sufficient to effortlessly match your stitching device with enough workspace round it. The desk ought to additionally be strong and solid to assist the burden and vibrations of the device at the same time as in use.
Ergonomics are vital too. Ideally, the desk top ought to assist you to stitch with out straining your returned or shoulders. You may also want to alter your chair top or upload cushions to attain an most excellent ergonomic role on the desk.
Since everyday tables lack integrated garage for notions and accessories, get innovative with organizing solutions. Portable bins, baskets or rolling carts can assist preserve the entirety you want inside reach.
To shield the desk floor from scratches, spills or snags, keep in mind the use of a mat or shielding protecting beneath your device`s paintings area.
While committed stitching fixtures gives purpose-constructed advantages, running with what you’ve got got is flawlessly viable, at the least whilst beginning off. With a few easy modifications, an normal desk can offer a totally useful stitching setup. As your interest grows, you could continually put money into a specialised stitching cupboard or desk down the road
Conclusion
In the end, choosing the best stitching desk comes right all the way down to your finances and particular stitching needs. Throughout this manual, we`ve taken an in-intensity have a take a observe a various array of stitching desk alternatives throughout diverse function units and fee points.
To make the high-quality preference on your situation, cautiously bear in mind which functions are must-haves as opposed to nice-to-haves. It can be beneficial to slender it down to 2 or 3 pinnacle contenders that high-quality in shape your requirements, after which evaluate them side-by-side.
By taking the time to very well compare the alternatives thru your personal non-public lens, you will role your self to select out the stitching desk this is the correct in shape on your stitching tasks and workspace. Be positive to preserve exploring for extra suggestions and insights to manual your shopping decisions


