A powerful needle can sew all the crap and bind it well to fill your rooms and closets. That’s upholstery and the winner is a versatile speedster Singer 191D-30 Sewing Machine which can easily handle medium to heavy fabric.
After completing all the house chores we all take rest, some on cushioned chairs while others get comfy on sofas. But how it feels when you sit and see a hole or tears in seats.
When you love sewing, you immediately want to repair it even when you know it needs specific tools and an upholstery machine too plus some knowledge about needles, fabrics and other things.
Upholstery is a material which is used for making soft covers for a seat of sofa, chairs etc. To make new or repair old you need stronger machine which can handle thick fabrics comfortably.
I have listed top 5 select range of sewing machines which are perfect for upholstery and can do other operations too.
You may browse through all the products with concentration and mark the features and budget which suits you the best.
Contents
- 1 Key Factors to Consider While Choosing A Sewing Machine For Upholstery
- 2 5 Top-Rated Sewing Machine For Upholstery With Reviews
- 3 Key Takeaways
Key Factors to Consider While Choosing A Sewing Machine For Upholstery
Upholstery needs a machine which can handle tough and difficult to handle fabrics with ease. A heavy duty, versatile and loaded with appropriate and necessary features sewing machine can give you results as per your choice.
However, to get the right machine for that right stitch is challenging. With continuous sincere efforts and knowledge every obstacle can be overcome. I hereby cited some of the crucial and critical factors for your ease to remember while going for the final investment.
Machine Built
Since you know upholstery operation is done on heavy and tough fabrics, it becomes necessary to opt for a strong metal design which can handle heavy vibrations and turbulence. Avoid plastic or any lightweight material as it can shake while doing heavy operations.
Another option is that you can go for a compact, lightweight upholstery machine if you have space constraints or you are always travelling. It can solve your daily needs but for longer hours may be these are not so fruitful.
Powerful Motor
One factor which plays a critical role is the motor. All the power and stability a machine acquires is from its motor. If the motor is powerful the mechanism will be swift and smooth otherwise you will need to put a lot of force to complete even a single stitch.
While choosing for upholstery you can vouch for an industrial machine, they by default have powerful machine which is capable to handle fabrics from thin to thick and soft to rough.
Needle and Thread
Likewise a machine is designed to carry out specific functions, similarly a needle is also built for particular fabric. A delicate needle will be useful for soft and lightweight fabric. But if you use the same needle for leather, it will snap.
For tough fabrics like we use in upholstery needs heavy duty needles and threads which can bind the fabric together with a quality and strong stitch. Thick needle will be capable to pierce a tough fabric conveniently.
Walking Foot
Walking foot is vital because it pulls a number of layers together at a constant rate through the machine. It avoids slipping of fabric resulting in poor finishing.
It is useful to prevent bottom and top layers from slipping or feed through the machine at various speeds.
Additional Features
The other features which you may note are reverse stitching feature to make every seam reinforced. Top loading bobbin for convenient winding of the thread on the spool. Centralized lubrication system which maintains the oil levels thus giving the smooth operations.
Besides, LED light, larger bobbins, free arm, attachable table, automatic threading mechanisms and many more. These features are not fancy ones but are very useful for versatile and quick assignments.
5 Top-Rated Sewing Machine For Upholstery With Reviews
1. Singer 4411 Sewing Machine![]()
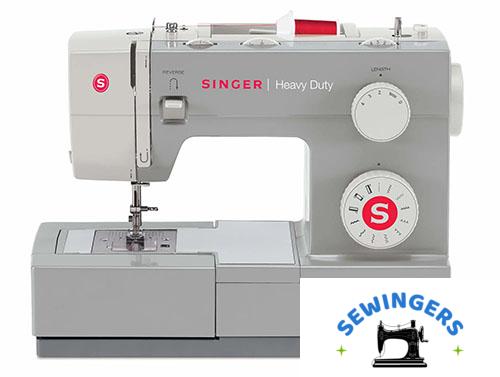
Singer has once again come up with a beautifully designed machine with powerful motor which can smartly handle all difficult-to-handle projects from canvas to denim. The 4411 Singer’s sewing machine is truly a delight to have.
The extra high sewing speed saves every second to complete the tasks within the timeline. The 1100 stitches in a minute which fast and efficient enough to give quality stitch to your outfit.
The metal frame of machine is heavy duty which gives stability while handling thicker and multi layered fabrics with ease. You can stitch personalized outfits, repair upholstery and sew a new cushion or seat cover.
This machine features 11 built-in stitches including 6 basic stitches, 4 decorative stitches and 4 step buttonhole stitch to attach perfect sized buttons. This charming machine is excellent for fashion sewing, home decor, crafts and more.
The top drop-in bobbin is covered with a clear view case through which you can check the thread left on the spool and wind it when needed. Plus, adjustable stitch length permits you to change the distance between stitches.
Different length of stitches can be used to design techniques such as basting, applique and many more. Additionally, with flexible presser foot pressure, you can stitch lightweight sheers, heavyweight denim or canvas.
The adjustable needle position has 3 different positions, you can choose any of these to put cording, zipping or a decorative touch with top stitching. Also, it can handle several types of fabrics so throw on it whatever you feel like.
The stitch width can be adjusted to 6mm. This flexible dimensions if set differently can make more pronounced and bolder look stitches. Besides, the built-in reverse stitch keeps the seams secure and strong and prevents unravelling.
The brand has specially mentioned that the machine is warranted to operate in Canada and the US at 110 volts only.
Pros
- Heavy duty durable and stable sewing machine
- True workhorse with stainless steel bed plate and powerful motor
- Comes with 11 built-in unique stitches
- All the basic, decorative stitches are included with a 4 step buttonhole stitch
- Metal frame provides longevity
- Adjustable stitch length lets you make customized patterns
- Ideal to stitch lightweight to heavyweight fabric
- The free arm and on-board storage is quite convenient and accessible
- Works well to sew sheers, covers for chairs or sofas
- Design new decorative curtains and pillows everyday
- Easy top drop-in bobbin with a transparent cover
- Includes built-in light to solve lowlight problems.
- Built-in reverse stitch to avoid unravelling and for reinforced stitches
Cons
- This machine has no automatic needle threader
- Users loved the machine except the needle position feature. They are unable to keep needle in centre for straight stitching.
2. Rex 607 Portable Walking Foot Sewing Machine![]()

This can be a probability that you might have not heard REX before this. But for your information, Rex is quite an old brand and people who have used their sewing machine claimed that it produces one of the best industrial sewing machines.
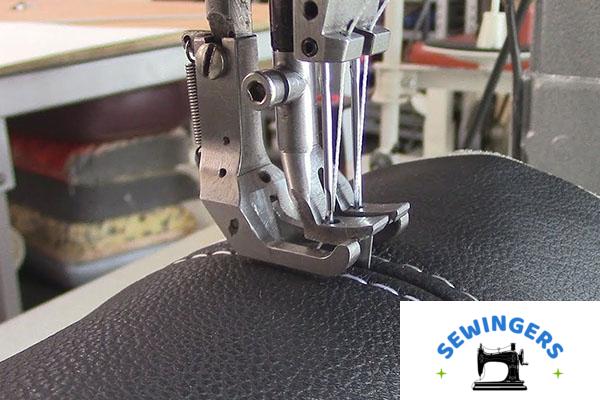
Rex 607 Walking foot sewing machine consists of full cast iron metal that is up to industrial standards. The built-in makes it strong and sturdy to bear turbulence while working on difficult materials such as leather, jeans, upholstery etc.
The portable machine can be placed anywhere around your room or can be carried while you travel. It efficiently deals with all the household projects from home decor to craft and more.
It doesn’t have any fancy options plus it handles various fabrics without causing any trouble during any operation. It can stitch only single stitch patterns in a straight line. It is a good companion for professionals.
You can stitch thick and tough materials such a s canvas or leather or even jeans and bring out the best from it. Still it will not vibrate and will stitch for long hours till you complete your tasks or projects happily.
The brand recommends nylon #69 bonded thread with needle size 135 x 17 size 22 to increase efficiency. This model is truly a time and money saver which can enhance the look and quality of every stitch you sew.
Pros
- Highly durable and sturdy because of full cast iron metal body
- Doesn’t cause any vibration due to thick or multiple layers of the fabric
- Works very well on leather, denim, canvas etc
- Every machine is pre tested and meets all the industrial standards
- It is shipped with a swn leather as a sample
- High efficiency as compared to its counterparts
- Every machine comes with pre-sewn leather patch
Cons
- Initially, it can be a little tight but it will get better when used regularly.
- A user said that it is a bit shaky.
- A buyer noticed that the oiling holes are missing so it is a bit difficult to oil it for better results.
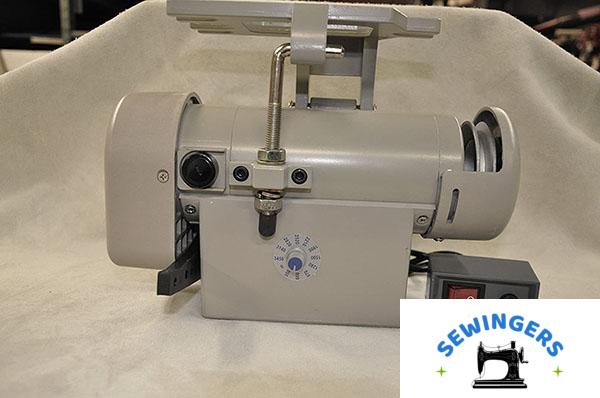
3. SINGER 191D-30 Sewing Machine

Singer is once again all geared up to give you the best performing sewing machine for all the seamstress, fashion designers, tailors, dry cleaners, home decorators and industrial sewists.
Singer 191D-30 sewing machine is impressing users for its straight stitching mechanisms, ease to use and extra high speed. It runs at an unbelievable speed of 4000 stitches in a minute which is rare and 6 times faster than regular machines.
It is one of the good options present in the market which is capable of handling bulk orders and high volume projects as well. In addition to this, you don’t have to deal with the unassembled parts as it is delivered completely assembled and intact.
This comes with industrial grade motor that makes it extra powerful and a total speedster. The powerful motor gives complete hold to the thick and multiple layered fabric without any turbulence and vibration.
This workhorse features a knee lifter that gives hands-free lowering and raising of presser foot to accommodate various layers of soft to tough fabric with ease. Also, the straight stitch that gives you lengths up to 5mm for more customizable functions.
Besides, the self-lubrication system maintains the smooth operations as the motor sits in the oil reservoir. To strengthen the seams and guarantees of stitch quality is done by reverse lever set up.
It comes with a table top bobbin to wind bobbins during sewing without bringing discontinuity in the operation. You can easily manage bulky projects on the large sewing space of 50 inches of table top length.
Other features like adjustable presser foot pressure, customizable stitch length ensure efficiency and comfortability. The sturdy H-leg stand maintains stability, safety and immobility while sewing at high speed for continuous long hours.
It comes with adornments which are placed in the accessory storage drawer. It includes pack of needles, small/medium/large screwdrivers, straight stitch foot, machine rest pin, oil container, and 3 bobbins.
Pros
- The versatile, powerful and sturdy industrial sewing machine
- Truly a speedster which sews at 4000 stitches in a minute
- Perfect choice for high volume domestic seamstresses, designers, home decorators, industrial sewers, tailors and everyone who love sewing
- Ideal for medium to heavyweight fabrics
- Built-in straight stitches with maximum stitch length of 5 mm
- Easy to use with impressive and way more features than your imagination
- Wind the bobbin while sewing
- Easily used for embroidery and even quilting plus upholstery
- Large sewing space and reverse lever to reinforce every stitch
- H-leg stand gives immobile, safe and stable sewing operation even at high speed
- Value for every penny you will spend
- Comes with a pack of essential features
- No need to do any manual assembly
Cons
- People found it pricey but are happy with the performance, efficiency and quality
- A user said that it would be better if you will avoid sewing leather on this.
- Most of the reviews are positive
4. Consew 206RB-5 Sewing Machine![]()

Your search ends here if you want a modern constructed machine which is an efficient workhorse with simple to use features then have a look on this delight by Consew.
Consew 206RB-5 is an industrial sewing machine with extra long stitch length to give you more personalized and flexible options. This setup gives you a freehand to do upholstery mechanisms.
This machine is for all kinds of sewing from leather to upholstery. You throw any fabric on it and it will beautify it to the best of its capability. It features a thread release finger for thick and heavy thread and high presser foot can be lifted up to 9/16 inches.
The large bobbin can be alternated while the material is being sewn. Also, the centralized arm lubrication has a reservoir oiled hook which keeps the machine properly oiled with micrometric control valve. It makes the process swift and smooth.
Flexible reverse stitching maintains the quality of the seam and prevents unravelling of the fabric. Plus, a safety clutch with push button re-arrangement, walking feet and needles are sufficient and versatile enough to give you decorate your home and closet.
To make sure the feeding fabric is even, there is walking foot and compound feet mechanisms. I don’t think anything more than this for an upholstery machine to do a complete and graceful operations.
Pros
- Efficient, simple to use and modern construction
- Quite easy to assemble, set and use
- Affordable and full features packed
- Recommended for heavy duty and auto upholstery operations
- From upholstery to leather sewing, everything is possible
- Centralized arm lubrication for smooth functioning
- Locking stitch regulator to avoid change of stitch length from vibrations
Cons
- A user found it difficult to thread the needle
- People are disappointed with the loud noise
- Thread options are difficult to understand
5. Janome HD3000 BE Sewing Machine, Black

After listening Janome nothing is required except the quantity of features. It is known for its versatility, value for money and efficient creations with new ideas. It is not stagnant like many other brands that came with a boom and now they are nowhere.
Janome creates, produces and sells the best and perfect sewing machines. Ranging from industrial to domestic, you think of the rarest thing and Janome has it all. This time Janome’s HD3000 BE edition is all set to complete your sewing room requirements.
The elegant black shade helps it to stand out with grace plus the exclusive bonus bundle is like a complete sewing package for all of you. The bold designed machine has straight forward mechanisms.
The 18 built-in unique stitches gives you a lot of personalized options with a one step buttonhole feature to attach beautiful button to the cushions, seats, curtains, shirts and wherever you feel like.
The 9 snap-on accessory feet includes blind hem feet, hemmer feet, zigzag feet, satin stitch feet, overedge feet, button sewing, transparent buttonhole, ultra-glide and buttonhole feet.
The features like convertible free arm, bright lit LED, adjustable stitch length (4mm) and width (6.5mm), hinged faceplate, 5-piece feed dogs and many more. These add ons are capable enough to setup a whole new range of upholstery.
The thread cutter for a clean and crisp designer finish, the hard cover to keep it safe from debris and dust with the maximum stitching speed of 860 stitches per minute completes the accessory family.
The feature rich machine includes a complete pack of accessories in the box. It comprises ¼ inches sem foot, cloth guide, 5 piece quilting kit, darning foot, craft foot, quilt guide, even feed foot and a 5-year extended warranty.
Pros
- A heavy duty sewing machine with a complete bundle of accessories.
- Relatively noise-free from its counterparts
- Automatic needle threader with amazing on-board bobbin winder
- To wind the thread smoothly, use horizontal spool with cap
- Feed dogs to keep the project on track
- Features stitch selector guide with presser feet guidelines
- Walking foot attachment for easy handling of multi layer assignments
- Drop-in bobbin with transparent window to keep the track of the thread on the spool
- Nice and unique range of stitch widths and needle positions
- LED bright light, convertible free arm for sewing round fabric like collars, sleves etc.
- The stitching speed is 860 stitches in a minute
- The machine doesn’t jump or vibrate while working on bulk and heavy projects
Cons
- A user claimed that this machine can’t stitch leather. But others are sewing many leather things with it.
- LED light is dim.
- A buyer said that he received a defective piece with messy and loose threads
Key Takeaways
For your convenience, I am here to provide the best guidance at the best of my capacity. In my opinion, the best sewing machine for upholstery is Singer 191D-30 Sewing Machine.
It gives excellent performance from crafts to upholstery and from fashion sewing to home decor. The features rich machine has all the needed features from basic to advanced level.
The speedster can sew 4000 spm which swift to complete any project. The heavy duty constructed machine is stable enough to work for long hours on even multiple layers of fabrics without vibrating for a single moment.
I have put all the top picks through a rigorous vetting process and till date these are best and most promising machine you will find. Singer 191D-30 works perfectly on any fabric from lightweight to heavyweight.
You got an offer for a big project, you are hesitant and bit nervous to accept it. Don’t be. Correct choices never lets you down. Say yes, and give your best in that. Have a Happy Sewing Week!
- Related post: Best Sewing Tables and Cabinets To Stuff Your Stuff